Tools
Collection of tools to work with loaded dataset or to split large file to tiles and load them.

Warning
Place 3D CursorandMeasuretools will not work on Windows and Linux with Vulkan GPU Backend in Blender 4.5 - 5.0. Change to OpenGL GPU Backend in Blender Preferences in order to make it work. Reported issue and it has been fixed. Blender 5.1 works fine with Vulkan backend.
Place 3D Cursor
Modal tool to place 3D Cursor on closest point in cloud under mouse cursor. GPU accelerated. Sets only 3D Cursor location.
3D Cursor is an overlay, it is drawn by Blender behind points so it may not be visible depending on points density, this is known issue.

Measure
Measurements are created with modal tools and can be stored in blend file, edited, converted to mesh or copied to clipboard. Engine that draws measurements is independent on loaded tileset so stored measurements can be draw on screen without loaded point data.
To measure click desired tool type button and then click points in viewport to add new vertices. To store measurement click ![]() button or with SPACE key in tool. New item will be added to list. Each measurement can be split to “elements”, this is necessary for measurements that need more vertices to define, those are
button or with SPACE key in tool. New item will be added to list. Each measurement can be split to “elements”, this is necessary for measurements that need more vertices to define, those are Distance, Angle and Area (Point and Height supports this as well, but it won’t make any difference on screen). With N key you will start new element while already defined is kept and when measurement is stored, all elements are written to measurement item.
Measurement list item can be renamed clicking item label, edited with ![]() button, hidden with
button, hidden with ![]() , measurement texts hidden with
, measurement texts hidden with ![]() , on screen values switched between container local space or global space with
, on screen values switched between container local space or global space with ![]() /
/![]() and color can be set with last color picker button in row.
and color can be set with last color picker button in row.
Drawing of stored measurements on screen is controlled with Draw and Erase buttons under the list. Measurement that is being edited with modal tool is always drawn in viewport.
Point Distance and Vertex Distance values controls distance in pixels around mouse cursor to be considered when selecting point or existing measurement vertex. Best leave at default values because can cause worse performance if set too high, increase only when you have trouble selecting points or vertices.

There are several other options and operators under ![]() menu.
menu.
Use Random Colors- each new measurement will have random color instead of default when enabledUse Shift/Scale- values on screen will use values with shift/scale unapplied, this will work only if set in global space
Update To Current Shift/Scale- operator to update measurements if you change shift/scale of whole tileset after measurement is storedFrame Selected- move selected item vertices to viewMerge By Type- will merge all items of same type to one itemSelected To Clipboard- will copy values you see on screen from selected measurements to clipboardSelected To Mesh- will add new mesh object with vertices (and edges or polygons, depends on type) from selected measurement itemClear Stored Measurements- remove all stored

Measure Tools
All tools define vertices by selecting points on screen and all have similar controls. Tools have its own undo/redo system that will work only while tool is running, only adding new measurement is written to Blender history.
- LMB - create new vertex on point under mouse cursor, until you release mouse button, vertex can be repositioned
- RMB - move existing under mouse cursor
- CTRL+LMB and CTRL+RMB - will stop snapping to points
- X - remove vertex under mouse cursor if exists
- CTRL+X - will remove all current tool vertices (those not yet stored)
- N - create new “element”, in case of
Distance,AngleandAreatools, next click will start new line or polygon - F - frame last “element”
- SPACE - store measurement in list and reset tool
- CTRL(+SHIFT)+Z - undo (redo)
- ESC - exit tool
Distance and Angle tools have one more shortcut:
- C - to toggle cyclic, close line into a loop
Point
Define vertices with XYZ values.

Height
Define vertices with Z value.

Distance
Define line between multiple vertices with total length and lengths for each segment.

Angle
Define line between multiple vertices with angle between each 2 segments.

Area
Define triangulated ngon between multiple vertices with total area of triangles.

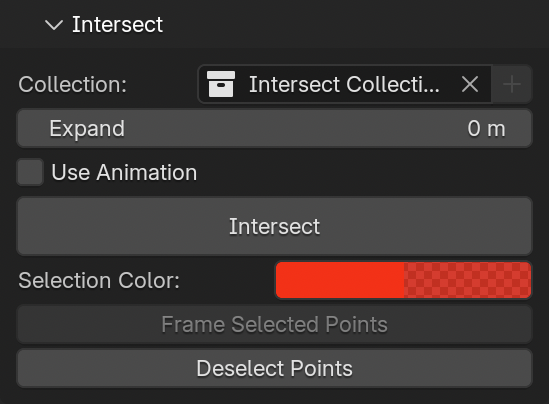
Intersect
GPU accelerated intersection between collection of mesh objects (or to mesh convertible objects) and points in tiles. Individual meshes are turned to convex hulls for intersection detection, but each object is tested individually so overall geometry can contain concave shapes. Can be executed on current scene state or on animation - then each frame is evaluated and masks are merged. Result is presented in form of point selection.
For best results use closed, watertight, preferably low poly meshes, but it can deal with non-manifold meshes, but results may not be that predictable in all cases. ![]() button next to
button next to Collection pointer dropdown will make new collection from selected objects.
Expand value can serve as safe zone around meshes, will expand collision detection distance. If animation is enabled, you can also optionally set frame range to override Blender timeline start and end. Selection Color lets you change color of selected points for better visibility.
If you start Blender from command line animation processing progress is logged in terminal.

Convert
- TileSet To Standard PCV - merge all points visible and make new PCV instance loaded with the points
- Tiles To PCV Instances - make PCV instance for each tile and link tile source file to it, if some tiles are selected in list, only selected will be processed
- Tiles To Blender Pointclouds - convert all tiles to Blender Pointcloud data to be renderable, if some tiles are selected in list, only selected will be processed

Split
Example of split using Chunked Read by Dimensions, Cuboid Size: overall dimensions / 10, result is 95 files each at max 1800x1000m

Example of split using All At Once by Point Count, Count: 3 (×10⁶ = 3 000 000), result is 56 files each with max 3m points, most of the time number of points is slightly less to keep subdivision grid

All At Once
Split single file to tile files, all points from source file will be loaded, then split and pieces saved to Output directory, requires enough system memory to fit all data.
When file is selected, it’s header is read (if file format supports it) and point count and overall dimensions are displayed in panel to help deciding the rest of options. File can be split by dimensions or by max point count per file. Split by dimensions allows cube (same length in all dimensions) or cuboid (x, y, z lengths can be defined) shapes per cell. Pro Tip: for “2D” split, use cuboid shape and set Z to very large value outside of dataset dimensions, e.g. 100000.
Output format can only be LAS/LAZ/E57, LAZ is preferable because of compression and saving disk space. If source file is LAS/LAZ and output is also LAS/LAZ, original file header is reused, if not LAS 1.2 point format 3 is used.
After splitting, tiles will be automatically loaded (if ![]() is enabled) and instance settings set as per preferences (if
is enabled) and instance settings set as per preferences (if ![]() is enabled).
is enabled).
Preset ![]() menu in panel header will save your current Split settings into a preset.
menu in panel header will save your current Split settings into a preset.
If you start Blender from command line you can observe processing progress in terminal.

Chunked Read
Split single file to tile files, source file will be read in chunks, each chunk split and its points appended to initially blank files in output directory, works only with LAS/LAZ files because they allow chunked reading and writing.
Chunked read/write allows to process very large files that cannot be loaded to memory and can be faster then All At Once split type, but it is limited to maximum number of files written. OS have a maximum of concurrently opened files (typically 256), if this is exceeded, Python will fail to open (create) a new file and processing will not finish. This is set with Max Files Safeguard, default value of 100 should be safe, but decrease if you run into problems specific to your system.
After splitting, tiles will be automatically loaded (if ![]() is enabled) and instance settings set as per preferences (if
is enabled) and instance settings set as per preferences (if ![]() is enabled).
is enabled).
Preset ![]() menu in panel header will save your current Split settings into a preset.
menu in panel header will save your current Split settings into a preset.
If you start Blender from command line you can observe processing progress in terminal.

Batch Split
Split all LAS/LAZ/E57 files in Input Directory, each file is processed with active Split settings and files are written to Output Directory.
After splitting, tiles will be automatically loaded (if ![]() is enabled) and instance settings set as per preferences (if
is enabled) and instance settings set as per preferences (if ![]() is enabled).
is enabled).
If you start Blender from command line you can observe processing progress in terminal.
