Introduction
Display, edit, filter, render, convert, generate and export colored point cloud files.
Available at Superhive

 Standard Edition Key Features:
- Display hundreds of millions of colored points in 3d viewport, limited only by system and gpu memory.
- Any Blender object can be used as container for points, points are not part of Blender data (until converted to) for maximal performance.
- Supported file formats - read: PLY, LAS/LAZ, E57, PCD, any text based file format such as PTS, XYZ, TXT, CSV etc., write: PLY, LAS/LAZ, E57 and PTS.
- Custom PLY reader/writer optimized for point data and performance.
- Supports loading/editing/writing of 3D Gaussian Splatting PLY files, can reconstruct points colors from spherical harmonics and convert to Blender mesh that can be rendered in Cycles engine approximating 3DGS effect.
- Display points with many shading options that can be mixed together, display points with analytic shaders, display point normals, use clipping planes, display scalar values (value remapping in range, color schemes).
- Fast Navigation option that draws subsampled points into 3d viewport while is being navigated for smooth working with very large datasets.
- Cleanup points directly with modal selection tools or by using Blender edit mode with temporary mesh linked with points using Blender tools.
- Mesh Retopology tools that utilize vertices snapping to points and mesh drawn with custom shaders over points.
- Clip planes gizmos to interact with clipping planes visually, store/restore clip planes named states.
- Abundance of editing filters: subsample/voxelize/slice points, crop, boolean, join, split, color adjustment, remove by color or value, project on mesh, remove duplicates, estimate normals, point set registration, surface reconstruction and many more.
- Builtin gpu rendering to image or images sequence with viewport or transparent background.
- Convert points to various Blender mesh (and vdb volume) data for use with Geometry Nodes and rendering with any render engine while preserving all loaded scalar fields and normals.
- Generate point clouds from mesh surface, mesh volume, Geometry Nodes vertices with attributes and generate point clouds from whole scene by simulating lidar scanner or photogrametry.
- Working with PLY sequences, playback, batch convert, filter and export. Sequence can also be generated from mesh or scene.
- Can be used as debugging tool to display 3d location/normal/color data with easy to use python api.
- Extension, all libraries bundled, supported platforms Windows (x64), Linux (x64) and macOS (arm64 & x64)
+  Pro Edition Features:

- All Features as Standard edition
- Tiles mode that allows loading of huge datasets stored in multiple files with real LOD and octree
- Measure tools in Tiles mode
- Special shading options in Tiles mode optimized for datasets without colors
Standard Edition
- Display hundreds of millions of colored points in 3d viewport, limited only by system and gpu memory.
- Any Blender object can be used as container for points, points are not part of Blender data (until converted to) for maximal performance.
- Supported file formats - read: PLY, LAS/LAZ, E57, PCD, any text based file format such as PTS, XYZ, TXT, CSV etc., write: PLY, LAS/LAZ, E57 and PTS.
- Custom PLY reader/writer optimized for point data and performance.
- Supports loading/editing/writing of 3D Gaussian Splatting PLY files, can reconstruct points colors from spherical harmonics and convert to Blender mesh that can be rendered in Cycles engine approximating 3DGS effect.
- Display points with many shading options that can be mixed together, display points with analytic shaders, display point normals, use clipping planes, display scalar values (value remapping in range, color schemes).
- Fast Navigation option that draws subsampled points into 3d viewport while is being navigated for smooth working with very large datasets.
- Cleanup points directly with modal selection tools or by using Blender edit mode with temporary mesh linked with points using Blender tools.
- Mesh Retopology tools that utilize vertices snapping to points and mesh drawn with custom shaders over points.
- Clip planes gizmos to interact with clipping planes visually, store/restore clip planes named states.
- Abundance of editing filters: subsample/voxelize/slice points, crop, boolean, join, split, color adjustment, remove by color or value, project on mesh, remove duplicates, estimate normals, point set registration, surface reconstruction and many more.
- Builtin gpu rendering to image or images sequence with viewport or transparent background.
- Convert points to various Blender mesh (and vdb volume) data for use with Geometry Nodes and rendering with any render engine while preserving all loaded scalar fields and normals.
- Generate point clouds from mesh surface, mesh volume, Geometry Nodes vertices with attributes and generate point clouds from whole scene by simulating lidar scanner or photogrametry.
- Working with PLY sequences, playback, batch convert, filter and export. Sequence can also be generated from mesh or scene.
- Can be used as debugging tool to display 3d location/normal/color data with easy to use python api.
- Extension, all libraries bundled, supported platforms Windows (x64), Linux (x64) and macOS (arm64 & x64)
+ Pro Edition
- All Features as Standard edition
- Tiles mode that allows loading of huge datasets stored in multiple files with real LOD and octree
- Measure tools in Tiles mode
- Special shading options in Tiles mode optimized for datasets without colors
Installation
Platform Compatibility
- Windows (x64), Linux (x64) and macOS (arm64 & x64)
- macOS x64 (Intel Architecture) version is provided, but not tested (for Blender 4.5 only)
Blender Compatibility
As a general rule, using latest Blender LTS release is the best, at the time of writing it is Blender 4.5 LTS, latest LTS is used for development and will be the most tested Blender version
- Blender 4.5 LTS or later
- for Blender 5.1 and later use distribution zip with
-blender-5.1+suffix
Notes on Blender 5.0
- PCV is fully compatible on macOS with Metal gpu backend and on Windows/Linux with OpenGL gpu backend
- on Windows/Linux with Vulkan gpu backend, there is minor issue that has been fixed in Blender 5.1 (it is not clear if fix will be backported to Blender 4.5 LTS), this issue affects viewport postprocessing, Tiles shading and modal tools that depends on point selecting, if you switch gpu backend to OpenGL and restart Blender, all will be working as intended. Blender 5.1 works fine with Vulkan backend.
Notes on Blender 5.1
- Blender 5.1 comes with major changes relevant to extensions, Python version went from 3.11 to 3.13 and Numpy from 1.x to 2.x and all libraries that use compiled code need to be budled for new Python and all of them need to support new Numpy
- At the moment, only
Open3Dis not yet officially released for Python 3.13 and it is not bundled in PCV so features that depends on Open3D will not work - To install PCV in Blender 5.1, you need to download and install distribution zip for Blender 5.1 (
-blender-5.1+suffix), regular distribution zip will refuse to install
Notes on Blender 5.2
- Same as Blender 5.1
- When Blender 5.2 LTS will be released, PCV for macOS x64 (Intel Architecture) will no longer be updated and will be available only as legacy version for Blender 4.5 LTS
Installation
- download latest version
point_cloud_visualizer-*version*-*platform*-*architecture*.zipfor your system - start Blender, drag and drop zip into it
Update
- download latest version
point_cloud_visualizer-*version*-*platform*-*architecture*.zipfor your system - start Blender, go to
Preferences > Get Extensionsand find PCV in list - Choose
Uninstallfrom drop down menu - quit Blender
- start Blender
- install new PCV (drag and drop zip, see Installation)
Upgrade from PCV 3.0.x or earlier (Legacy addon)
PCV 3.1+, as extension, bundles all libraries, libraries installed by legacy PCV must be removed. Not doing so may lead to conflicts between bundled and legacy installed libraries, especially when another installed legacy addon still uses user site-packages directory for its dependencies.
There are two ways to do that: Automatic after new PCV installation via Check Environment button or Manual by deleting all libraries (packages) directories and files from inside of user site-packages directory.
If you are sure you didn’t previously install any library using legacy PCV Install *library* operators, you can skip all of the following steps. If you are not 100% sure, you can follow Automatic procedure.
Automatic
- Start Blender, go to
Preferences > Addons, find legacy PCV, disable and remove. Save Preferences (if automatic saving is disabled) and Quit Blender. - Start Blender again, install new PCV (drag and drop zip, see Installation).
- Go to
Preferences > Addons, find PCV, expand and underLibrariesclick Check Environment button. Operator popup will show any problems found and list of libraries installed in usersite-packagesdirectory if any are found there. If any library is found, now you can uninstall all libraries from shown list by runningUninstall Alloperator from popup (will runpip uninstall *package*for each library found in list, which should uninstall it only from usersite-packages, not anywhere else if you happen to have more copies). Quit Blender when operator finishes.
Manual
Manual option is recommended for advanced users, that way you will be sure nothing is left uninstalled.
- Start Blender, change any region to
Python Consoleand paste following command:
import site; site.getusersitepackages()
- Press Enter. Path to user
site-packagesdirectory will be printed out. Open this directory in your OS file browser. Usually the directory is on macOS/Linux at~/.local/lib/python3.11/site-packageson Windows%APPDATA%/Python/Python311/site-packages. Also usually this directory is hidden, you may need to enable showing of hidden directories in your OS file browser or paste path to File Explorer path bar on Windows or use Go to Folder (Command+Shift+G) on macOS. Leave window with directory opened. - From Blender
Preferences > Addonsdisable legacy PCV and remove. Save Preferences (if automatic saving is disabled) and Quit Blender. - Now manually remove libraries installed by legacy PCV (or any other legacy addon that uses the same system):
- Go to your OS file browser you opened earlier with opened user
site-packagesdirectory and remove everything inside (delete or move to another directory as backup, as you wish), doing so will uninstall all Python libraries installed to usersite-packagesdirectory. - If you are using some other legacy addon that installs libraries and uses user
site-packagesdirectory, you will need to let such addon reinstall them, usually disable and enable (if installs automatically) or click button in such addon preferences (if they let user do it manually).
- Go to your OS file browser you opened earlier with opened user
- Start Blender again, install new PCV (drag and drop zip, see Installation).
- To check if everything is OK and no other than bundled libraries are available, open PCV preferences and under
Librariessection, click Check Environment button, popup will open with info. If all is OK,All seems to be fine.message will be displayed.- Please note, if some other legacy addon uses user
site-packagesit will be detected and reported, if some other legacy addon installs any library automatically at startup, it will be also found and reported.
- Please note, if some other legacy addon uses user
Libraries
About Libraries
- some select PCV functions depends on 3rd party libraries
- all libraries are bundled in extension: Python Wheels
- with two exceptions (see Known Issues) they are included without modification as downloaded from The Python Package Index (PyPI) via
pip downloadcommand
Some libraries still have conflicts with other libraries (mainly on Windows platform) which may lead to Blender crash. PCV has automatic system to prevent that, PCV Preferences > Libraries > Resolve Library Conflicts Using Python Subprocess, it is enabled by default. This system runs such operation in another python process without Blender. Input data are saved to disk, separate python process is launched, data processed and written back to disk. Results are collected back to Blender and temporary files removed, slightly slower to run, but prevents freezes and crashes.
PCV is tested on macOS 15 Apple Silicon (arm64), Windows 10 (x64) and Ubuntu 24.04 (x64). macOS Intel (x64) is provided, but not tested.
Bundled Libraries
Following libraries are bundled and used by PCV. There are also wheels of their dependencies, for complete list, look into extension wheels directory.
Laspy
Laspy is a python library for reading, modifying and creating LAS LiDAR files.
License: BSD License
lazrs
Python bindings for the laz-rs crate. Implementation or rather, translation of LAZ (laszip compression) format in Rust.
License: MIT
pye57
Python wrapper of LibE57Format to read and write .e57 point cloud files
License: MIT License (MIT)
SciPy
SciPy (pronounced “Sigh Pie”) is an open-source software for mathematics, science, and engineering. It includes modules for statistics, optimization, integration, linear algebra, Fourier transforms, signal and image processing, ODE solvers, and more.
License: BSD License
Open3D
Open3D: A Modern Library for 3D Data Processing
License: MIT License (MIT)
PyMeshLab
PyMeshLab is a Python library that interfaces to MeshLab, the popular open source application for editing and processing large 3D triangle meshes. Python bindings are generated using pybind11.
License: GPL3
- https://www.meshlab.net/
- https://github.com/cnr-isti-vclab/PyMeshLab
- https://pypi.org/project/pymeshlab/
psutil
Cross-platform lib for process and system monitoring in Python
License: BSD License (BSD-3-Clause)
pcv_voxel_downsample
Known Issues
pye57wheel for macOS, Intel architecture (x64) is built from source because official wheel is not available at PyPIPyMeshLabwheel is not installed properly by Blender (Issue Report), bundled wheels are repacked by me to format Blender expects until Blender is fixed. Contents is the same, only two extra directoriespymeshlab-2023.12.post2.data/purelibabove actual module are removed and paths updatedOpen3Ddependencies has problem installing on Windows because of path length limit (Issue Report), offending wheel is not included in PCV, so Open3D installation is not complete. Its gui functions may be broken, but PCV does not use any of that. Just keep that in mind if you plan to use Open3D in your own custom scripts. macOS and Linux platforms are unaffected by this issue, only Windows.
General Concepts
Integration
- PCV uses any Blender object as a “point in space”, that object origin serves as zero point. Point cloud will then draw in object local space. i.e. point cloud will be transformed in the same way as container object. The best is to use
Emptyobject type as containers. - PCV by default does not store loaded points in blend file because there is no suitable data type available. Only PCV settings and path to data file is stored. when blend file is reopened, points need to loaded from linked file again by clicking
Drawbutton. If you wish to store points in.blendfile, seePackerin Preferences for more info. - Any changes to points made with PCV have to be saved using Export panel before quitting Blender or loading other blend file, otherwise will be lost.
UI Locations
- main PCV panel is located in 3D Viewport Sidebar N under
Point Cloud Visualizertab - one more extra pop up panel in 3D Viewport header at the top right corner
- helper operator in
3D Viewport > Addmenu
General Use
To load and display point cloud from any supported file type, you can add an Empty type object to scene (or use any other Blender object type that exists in scene), then go to 3d Viewport sidebar > PCV tab and click Choose File ![]() , file browser will open, select your file and click
, file browser will open, select your file and click Load. File will be loaded and contents displayed.
Add Menu Helper Operator
Faster and preferable way of adding PCV instance to scene is to use helper operator from Add menu: 3d Viewport header > Add or Shift+A anywhere in viewport and choose Point Cloud Visualizer menu item. File browser will open where you can choose single or multiple files, click Add PCV Instance(s) and for each selected file, new Empty object will be added, named after file name and file contents will be loaded and drawn.
Any file format that is readable by PCV can be loaded this way, only ASCII file types need to use preset that has been made and saved in advance and multiple files have to have the same format.
File Drag and Drop Support
Files can be loaded by dragging and dropping file to Blender 3D viewport. Upon drag and drop, Add Helper operator is invoked where you can set options. Drag and drop is supported only for .ply, .las, .laz, .e57 and .pcd files. Ascii file types are not supported.
Because Blender has its own .ply importer, if any of dropped files is a .ply file, you need to choose Add PCV Instance(s) option from automatically displayed menu to use PCV.
Large Datasets
Large Datasets
- currently, PCV needs to load all points from source file and keep them in system memory
- during loading, system memory usage will peak quite high, 4 (and more in some cases) times the runtime usage
- for display, PCV need to upload all points that are going to be displayed (you can control amount with
PCV > Display > Percentageslider) to gpu memory - to determine approximate maximum number of points your gpu can display at once you can use calculator in PCV preferences (for example 8GB gpu can display ~300M points with default shader and disabled scalars), calculator formula is simple:
ram = 8192  # MB
b = (1024*1024) * ram  # bytes
# default shader uses 3x float32 for point location and 4x float32 for color (rgba)
# float32 takes 4 bytes, hence 3*4 + 4*4 bytes
n = int(b / (12 + 16))
print(n)  # 306783378
- trying to display more points (i.e. uploading more data than gpu memory can contain) will result in Blender crash or freeze
- when extremely big data need to be loaded and is not required to work with exactly all points, alternative loading methods
Every NthorSlicecan be used to reduce number of points during loading
Fast Navigation
Draw low resolution point cloud during viewport navigation, it is enabled in PCV Preferences globally and will apply on all PCV instances in scene. During viewport navigation, normals and bounding box drawing is skipped, there rest of shading options is kept, selection is always drawn in full. Each PCV instance can be excluded by unchecking PCV > Display > Options > Use Fast Navigation.
Note: Blender API has no way to tell if user is navigating viewport (well, at least without using modal operator and that is not applicable in this case) so solution involves timers and because of that, when you are still navigating, but pause any movement a bit, high resolution will be drawn after delay and also first redraw when you just started navigating might lag a bit, API does not provide mouse events so i cannot react before view is really changed.
Panels
Main Panel
Main PCV panel is located in 3D Viewport Sidebar N under Point Cloud Visualizer tab. This panel shows active object properties and operators.
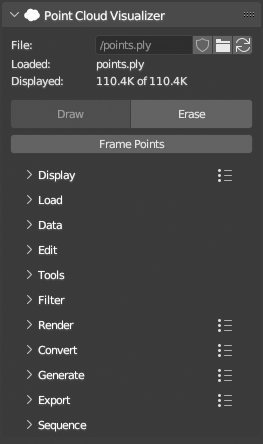
Main Controls
- Choose file clicking browse icon
 and from now on, active object is considered a “PCV Instance”.
  and
and  indicates
 Packflag status. See Preferences for more info. reloads linked file contents.
- Linked file name and number of loaded / displayed points.
DrawandEraseoperators.Drawoperator will also load points if they are not loaded.Erasewill only stop drawing in viewport, loaded points will remain in system memory.Frame Pointswill center points in viewport camera and adjust itsClip Endproperty if needed to show all points.
3D Viewport Panel
Pop up panel at the top right corner of 3D Viewport header contains actions that can run on multiple PCV instances at the same time, Packer operators that work with current blend file and Postprocess options.
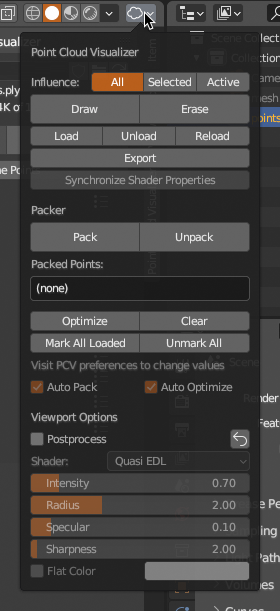
Batch Operators
- Run basic loading, drawing and export operators on every PCV instance that is found in scene and falls under
Influence. It is the same like selecting object by object and clicking operator button. Synchronize Shader Propertieswill copy display properties from active to influenced instance.
Packer
Packeris fully automated storing of loaded points directly in.blendfile as hidden mesh datablocks on.blendfile save and restoring points from stored meshes on.blendfile load. See Preferences for more info.PackandUnpackoperators are run automatically on.blendfile events or can be run manually from here.Optimizewill remove stored meshes if PCV instance is no longer present in.blendfile, this is also automated during packing or can be run manually from here.Clearwill remove all stored meshes.Mark All LoadedandUnmark Allwill setPack flag on all pcv instances in scene.Packed Pointsare will show summary of stored mesh datablocks.
Postprocess
Viewport postprocessing. All draw calls from PCV goes to Offscreen first, then everything is drawn on top of viewport using selected shader. Because of that, points will be always on top above everything else.
Currently there is: Quasi EDL, something very similar to Eye-Dome-Lighting. Points are shaded in screen space by their depth. No normals are required. The best use for it is when your points have no other data than point locations. And Image Ouput that will create image datablock with the same content as is drawn on screen, useful for quick screen renders without camera and setting anything.
Warning
Postprocess will not work on Windows and Linux with Vulkan GPU Backend in Blender 4.5 - 5.0. Change to OpenGL GPU Backend in Blender Preferences in order to make it work. Reported issue and it has been fixed. Blender 5.1 works fine with Vulkan backend.
Display
Display panel contains everything related to how points are displayed in viewport. Main shader for points is chosen with Shader dropdown menu. Default shader offers many options for shading that can be mixed together using Opacity and Mode, other shaders are more analytical (Position Colors, Normal Colors and Height Colors) and offers only a few properties for data they show.
Preset ![]() menu in panel header will save all settings in all subpanels into a preset.
menu in panel header will save all settings in all subpanels into a preset.
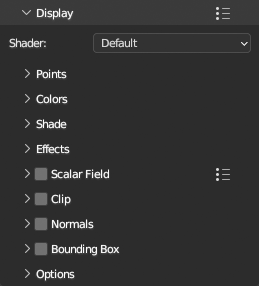
Points
Points panel contains settings related to point visibility, shape and size.
Percentage- Adjust percentage of points displayedShuffle Points- Shuffle points if they are ordered soPercentagelower than 100% shows evenly distributed pointsUse UI Scale- Multiply point size by UI Scale (Preferences > Interface > Resolution Scale)Round Points- Draw rounded pointsSize- Point size in pixelsWorld Size- Set point size in world units (i.e. meters)Fast Nav Size Factor- Increase point size when viewport is navigated for better visibilityCulling- Cull points facing backwards, requires point normals

Colors
Colors panel contains settings related to point color or color generation, shows for Default shader only
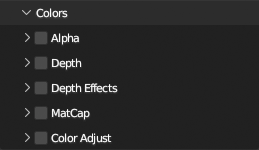
Alpha
Global Alpha- Adjust overall alpha of pointsUse Alpha Per Point- Use alpha per point if point colors contain alpha value

Depth
Colorize points by depth from viewport camera
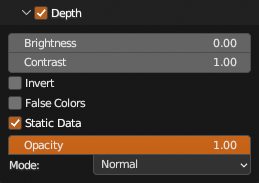
Depth Effects
Colorize points by depth from origin or another object

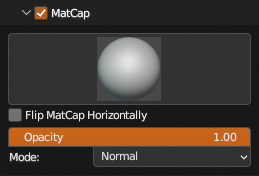
Matcap
Colorize points using matcap image, requires normals. Matcap images are listed from BLender > Preferences > Lights > MatCaps and Blender builtin.
Blender 5.0 ships with matcap images as multilayer EXR files, there is no python API to read these images as pixel arrays, so new matcap images from Blender cannot be used. To restore functionality, copy matcap images from Blender 4.5 installation (System Directory) .../4.5/datafiles/studiolights/matcap/*.exr to User Directory .../5.0/scripts/presets/point_cloud_visualizer/matcaps/*.exr (more info about Blender Directory Layout) and old matcap images will show in menu and can be used. If you used any custom matcap images, copy them there as well. If target directory is empty or missing, one matcap image bundled with PCV will show in menu with a warning in panel.
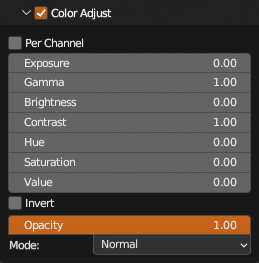
Color Adjust
In shader color adjustments, to apply at point colors use Filter > Colors > Color Adjustment
Per Channel- Adjust Exposure, Gamma, Brightness and Contrast per color channel (R, G and B separate)
Shade
Shade panel contains settings related to point shading, shows for Default shader only and each requires normals.

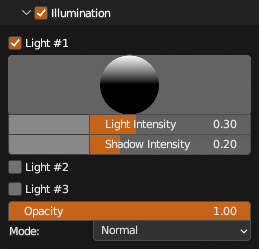
Illumination
Add up to 3 lights to illuminate points.
Phong
Use Phong shading
Fresnel
Shade points by Fresnel value
X-Ray
Draws points in additive mode and those with normal oriented closer to view normal with proportionally lower opacity. Because of additive mode, depth buffer is cleared before drawing.
Effects
Effects panel contains settings that manipulate with point location directly in shader. Shows for Default shader only. To apply at points use Filter > Points > Apply Shader Effects
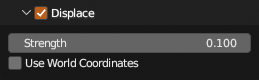
Displace
Move points along their normals
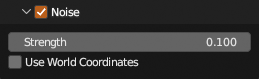
Noise
Move points randomly
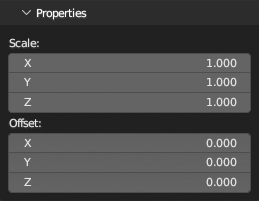
Position Colors Shader Properties
Properties for Position Colors shader contains location color grid scale and each grid cell offset.
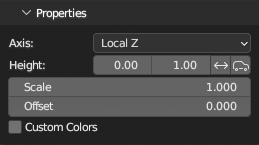
Height Colors Shader Properties
Properties for Height Colors shader contains axis selection, remapping options and custom colors.
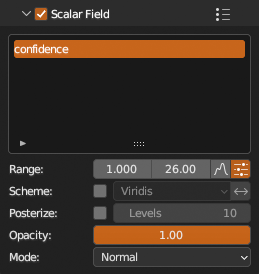
Scalar Field
Contains a list of available scalar fields, value remapping options and colorization schemes.
Clip
Clip displayed points by up to 6 planes. You can control each plane individually by gizmo that is enabled by clicking ![]() button.
button.
Reset To Data Bounding Box will reset all planes to data bounding box, ![]() in local coordinates or
in local coordinates or ![]() in world coordinates.
in world coordinates.
Clip planes state can be saved per object clicking ![]() button and removed by
button and removed by ![]() . Stored state will be restored by
. Stored state will be restored by ![]() button on list item.
button on list item.
All planes at once, aligned to a cuboid, can be controlled with Clip Box gizmo, ![]() shows translate handles,
shows translate handles, ![]() rotate handles,
rotate handles, ![]() move box vertices,
move box vertices, ![]() move box sides and
move box sides and ![]() to move opposite faces together or in inverse direction.
to move opposite faces together or in inverse direction. Clip Box uses all 6 planes to determine its location, rotation and dimensions by intersecting planes together, if that for any reason cannot be done (e.g. 3 planes at corner does not intersect in a single point), it resets itself to data bounding box. If any plane is rotated with Clip Plane gizmo out of right angle, it will reset to data axis aligned bounding box in world coordinates. For most predictable results reset state before enabling and don’t mix both gizmos together.
You can also use any Blender Object bounding box to set planes from. If ![]() is enabled, bounding box source object can be animated and clip planes will be updated on each redraw.
is enabled, bounding box source object can be animated and clip planes will be updated on each redraw.
Set Clip Planes From Object Bounding Box will set planes from object bounding box and Clone Unclipped Points will clone unclipped points to a new PCV instance.

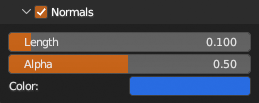
Normals
Visualize point normals as lines.
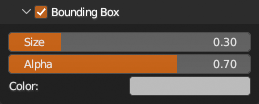
Bounding Box
Draw points Bounding Box.
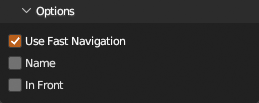
Options
Other Display options
Use Fast Navigation- Include or exclude fromFast Navigation, see Preferences for more infoName- Draw source file name in viewport at originIn Front- Draw points above everything else
Load
Load panel contains everything related to how points are loaded from source file.
Reload File- Reload selected file using current settings.Unload File- Unload file from memory.
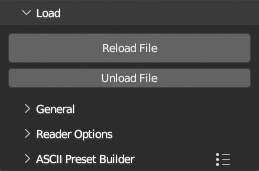
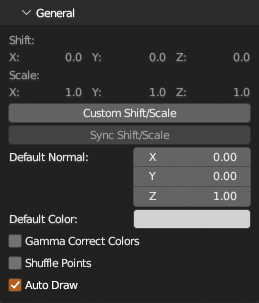
General
Contains settings how raw data is processed after loading.
Shift,Scale- Overview of determined (if any) shift/scale values used on points positions.Custom Shift/Scale- Set custom values for shift/scale.Sync Shift/Scale- Aplly shift/scale from active instance to selected.Default Normal- If normals are not found in source file, this values is used instead.Default Color- If colors are not found in source file, this values is used instead.Gamma Correct Colors- Apply gamma correction on colors ascolor ** (1 / 2.2).Shuffle Points- Shuffle points after loading.Auto Draw- Draw points after loading.
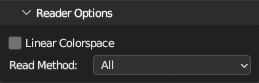
Reader Options
Allows you to access specific file reader options that was set when source file has been chosen with Load or Add operators. To apply changes click Reload File.
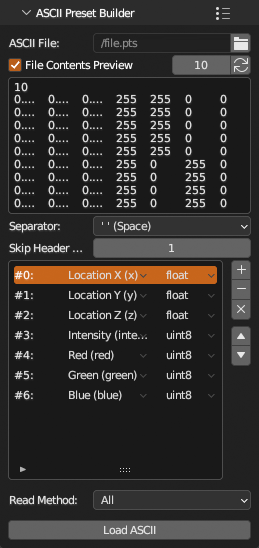
ASCII Preset Builder
Build and save any ASCII file type loading preset.
Choose file with ![]() icon. If you don’t know file structure, enabling
icon. If you don’t know file structure, enabling File Contents Preview will show first 10 lines from file. Choose column sparator type and set number of line to skip if file contains any header info. Then use ![]() to add row in list (which is column in file) and set column type and its data type.
to add row in list (which is column in file) and set column type and its data type.
To check if recipe is working, click Load ASCII, if everything works without error and data are interpreted correctly, use ![]() in panel header to save current state as preset for later reuse.
in panel header to save current state as preset for later reuse.
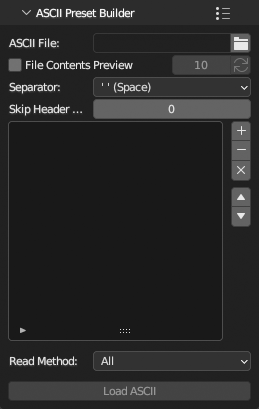
Example of typical PTS file preset
Standard PTS contains 7 columns in order x, y, z location, intensity and r, g, b color. In reality, PTS can contain any number of columns of any type.
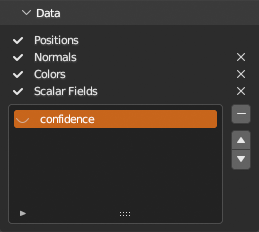
Data
Contains overview of data loaded from source file. ![]() next to data name indicates availablity.
next to data name indicates availablity.
To remove Normals, Colors and all (![]() buttons) or individual
buttons) or individual Scalar Fields (select scalar from list and click ![]() ).
). ![]() and
and ![]() moves selected scalar field up or down in list. This order is kept when file is exported if file format supports it.
moves selected scalar field up or down in list. This order is kept when file is exported if file format supports it.
Clicking ![]() icon next to scalar field name will enable Display > Scalar Field (
icon next to scalar field name will enable Display > Scalar Field (![]() ).
).
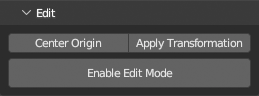
Edit
Center Origin- Moves points so center of points is at container origin.Apply Transformation- Applies container transformation on points and resets container transformation.Enable Edit Mode- Edit points using Blender Edit Mode.
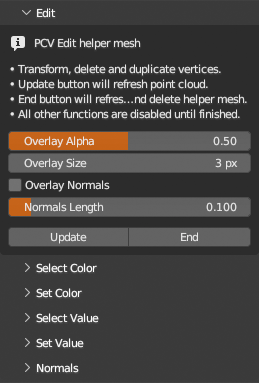
Edit Mode
- When enabled, points are converted to mesh vertices and PCV draws original points over vertices.
- You can use edit vertices with Blender tools.
- To update edits in points, click
Update. - To finish click
End. - Edit mode includes subset of display options, selection operators that select mesh vertices based on points color or scalar value, operators that set color or value and operator to flip point normal (not mesh vertex normal, those are ignored).
- While you can create new mesh vertices and they will be added to points, it is better to duplicate and move existing so all colors/normals/scalars are already set.
Tools
Collection of modal operators for direct editing of points, points container object or mesh. If operator is running all panels but Tools are disabled. To switch tool, click its button on panel.
All Retopology and Transform tools and Place 3D Cursor (GPU) are GPU accelerated. They utilize GPU for point selection. Points are selected in Detection Radius around mouse pointer, point closest to screen space center is selected. Point selection works best if points are that dense so they cover points behind them. If your points are too sparse, there are several options how to prevent selection of points behind those on “surface”. Increase point pixel size, or enable Display > Points > Adaptive Size and adjust point size so they cover space between them, or enable Use Depth (D key shortcut) at running tool panel to utilize gpu depth buffer to determine which points are closest in tool Detection Radius.
All tools when running shows help panel in viewport with all modal shortcuts. This help panel can be toggled with H key or disabled in preferences Show Help Panel At Tool Start.
Warning
Tools (all of them depends on selecting point on screen) will not work on Windows and Linux with Vulkan GPU Backend in Blender 4.5 - 5.0. Change to OpenGL GPU Backend in Blender Preferences in order to make it work. Reported issue and it has been fixed. Blender 5.1 works fine with Vulkan backend.
3D Cursor
3D Cursor tools operate only on 3d Cursor.
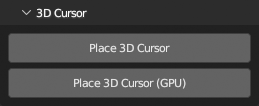
Place 3D Cursor
Place 3D Cursor on closest point in cloud under mouse cursor. CPU variant, faster on smaller datasets.
LMB: PlaceShift+LMB: Place and align with normalLMB+drag: Continuous placeH: Toggle Help panelESC: Exit
Place 3D Cursor (GPU)
Place 3D Cursor on closest point in cloud under mouse cursor. GPU accelerated variant, faster on large datasets.
LMB: PlaceShift+LMB: Place and align with normalLMB+drag: Continuous placeD: Toggle using depth buffer for point selectionH: Toggle Help panelESC: Exit
Transform
Transform tools operate on points container object. They will not modify points only container transformation in world coordinates.
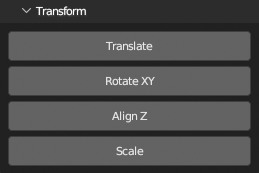
Translate
Translate points container so selected point is at chosen location.
LMB(+drag): Set pointF: TranslateD: Toggle using depth buffer for point selectionRMB: Cancel current transformCTRL(+SHIFT)+Z: Undo(Redo)H: Toggle Help panelESC: Exit
Rotate XY
Rotate points container to align AB and BC lines between chosen 3 points and world Y and X axes.
LMB(+drag): Set 3 pointsF: RotateC: Toggle Use CornerD: Toggle using depth buffer for point selectionRMB: Cancel current transformCTRL(+SHIFT)+Z: Undo(Redo)H: Toggle Help panelESC: Exit
Align Z
Rotate points container to align tow selected points with world Z axis.
LMB(+drag): Set 2 pointsF: AlignC: Toggle Use FirstD: Toggle using depth buffer for point selectionRMB: Cancel current transformCTRL(+SHIFT)+Z: Undo(Redo)H: Toggle Help panelESC: Exit
Scale
Scale points container to make length between two selected points equal chosen value.
LMB(+drag): Set pointsF: ScaleC: Toggle Use CenterD: Toggle using depth buffer for point selectionRMB: Cancel current transformCTRL(+SHIFT)+Z: Undo(Redo)H: Toggle Help panelESC: Exit
Cleanup
Cleanup tools will remove selected points from memory. If you need to save edits, export as ply after you are finished with cleanup.

Box Select
Select points using box selection.
LMB+drag: Draw selectionSHIFT+LMB+drag: Add to selectionCTRL+LMB+drag: Subtract from selectionA: (De)Select allRMB: Deselect allI: Invert selectionX: Remove selectedH: Toggle Help panelESC: Exit
Lasso Select
Select points using lasso selection.
LMB+drag: Draw selectionSHIFT+LMB+drag: Add to selectionCTRL+LMB+drag: Subtract from selectionA: (De)Select allRMB: Deselect allI: Invert selectionX: Remove selectedH: Toggle Help panelESC: Exit
Circle Select
Select points using circle selection.
LMB+drag: Draw selectionSHIFT+LMB+drag: Add to selectionCTRL+LMB+drag: Subtract from selection[and]: Adjust radiusA: (De)Select allRMB: Deselect allI: Invert selectionX: Remove selected pointsH: Toggle Help panelESC: Exit
Gradient Select
Select points using gradient selection.
LMB+drag: Draw selectionSHIFT+LMB+drag: Add to selectionCTRL+LMB+drag: Subtract from selectionC: toggle constrain to vertical and horizontal axesA: (De)Select allRMB: Deselect allI: Invert selectionX: Remove selected pointsH: Toggle Help panelESC: Exit
Retopology
Retopology tools operate on separate mesh object. You can create one before running tool or create new at any time while tool is running.
For better mesh visibility while any Retopology tool is running, target mesh is hidden from viewport and drawn on top of points with custom shaders.
All Retopology tools allow switching to Blender Mesh Edit mode at any time for using Blender tools. When edit mode is exited, initial Retopology tool will be restored. In short, TAB into mesh edit mode, do what is needed, TAB back to initial Retopology tool to continue.
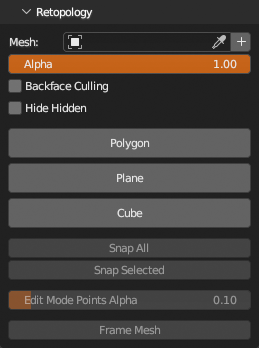
Polygon
Draw polygons while snapping vertices on points or existing vertices in target mesh.
LMB: Place (on points) / Select (vertex in mesh)LMB+drag: Continuous place (on points) / Select more (vertices in mesh)CTRL+LMB+drag: Tweak placed point (while snapping on points and vertices) / Tweak mesh vertex (while snapping on points and vertices)D: Toggle using depth buffer for point selectionB: Toggle Ignore Backfacing (for mesh vertices selection)M: Toggle Merge Mesh Vertices (disabled if selection exists)RMB: Cancel current polygon / Cancel tweak if activeF: Make polygon from placed and/or selected / Make quad from single selected mesh vertex in corner and mouse locationX: Delete selected mesh verticesTAB: Toggle Mesh Edit modeCTRL(+SHIFT)+Z: Undo(Redo) mesh edits only (Toggle Mesh Edit mode resets history)CTRL+S: Save the current Blender fileH: Toggle Help panelESC: Exit
Trace
Trace floor plan while snapping vertices on points and keeping the same height
LMB(+drag): Place vertex’,CTRL+LMB: Tweak vertex with snapping’,CTRL+SHIFT+LMB: Tweak vertex without snapping’,F: Make line/polygon’,E: Toggle Fill’,C: Toggle Cyclic’,A: Toggle Auto Commit’,RMB: Cancel current line’,D: Toggle using depth buffer for point selection’,TAB: Toggle Mesh Edit mode’,CTRL(+SHIFT)+Z: Undo(Redo) (Mesh Edit mode resets history)’,CTRL+S: Save the current Blender file’,H: Toggle Help panel’,ESC: Exit’,
Plane
Make quad plane rotated to fit selected points.
LMB(+drag): Select pointsCTRL+LMB(+drag): Deselect pointsCTRL+SHIFT+LMB(+drag): Rotate planeRMB: Cancel current planeF: Make planeN: Make plane as new mesh objectD: Toggle using depth buffer for point selectionTAB: Toggle Mesh Edit modeCTRL(+SHIFT)+Z: Undo(Redo) (Mesh Edit mode resets history)CTRL+S: Save the current Blender fileH: Toggle Help panelESC: Exit
Cube
Draw Cube alias Rectangular Cuboid snapped to points by setting three initial corners and arbitrary height.
- 3x
LMB(+drag): Place Cube Corners (drag moves last placed) - After 3rd corner, set cube height
- 4th
LMB: Make cube CTRL+LMB: Tweak last cube vertices freelyCTRL+SHIFT+LMB: Tweak last cube vertices and snap to pointsRMB: Cancel current cubeD: Toggle using depth buffer for point selectionTAB: Toggle Mesh Edit modeCTRL(+SHIFT)+Z: Undo(Redo) (Mesh Edit mode resets history)CTRL+S: Save the current Blender fileH: Toggle Help panelESC: Exit
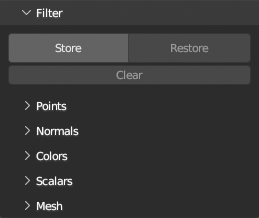
Filter
Collection of filters sorted to categories Points, Colors, Normals, Scalars and Mesh. General rule is, filters removing something are on top, then modifying and lastly adding filters, order from probably most used to less.
Undo/Redo
Filters operate on loaded points directly and since loaded points are not part of Blender data system, Blender undo system cannot be utilized. Because of that, very simple undo system is available. It is mainly meant for filters, but it is working also with tools etc, everything that change loaded point data directly.
Store state of point data with a button, then Restore if you want to go back to that stored state at any time, only one state is stored, it is cleared when new point cloud file is loaded, current unloaded, container object is deleted and renamed, when new blend file is loaded or when Clear button is pressed.
Points
Filter > Points panel contains filters operating on points or points positions.
Filters are directly applied on loaded points, Blender undo system does not work. To have single history state to return to, see Store/Restore state operators
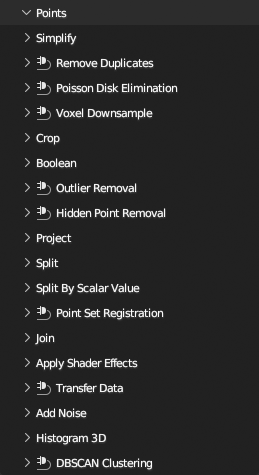
Simplify
Contains several methods to reduce number of points.
Distant Samples- Start from random point, select number of candidates, accept the most distant from already accepted, repeat. This is very slow process on large datasets. See Poisson Disk Elimination for much faster algorithm with similar result.Voxel Grid- Split points to grid, remove extra points, average normals, colors and scalars per grid cell. Slower than Voxel Downsample, but has more options.Slice- Slice by percentage. Optionally shuffle points before slicing. Similar effect asDisplay > Points > Percentage, but modifies points directly.Reduce- Reduce point cloud to exact number points. Same asSlice, but allows you to set target number of points.
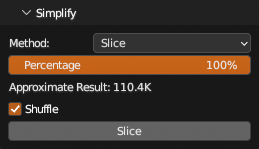
Remove Duplicates
Remove points by minimal distance between them. Operates on transformed point locations in world coordinates.
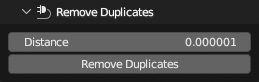
Poisson Disk Elimination
Downsample points by removing points that are within set radius from other points.
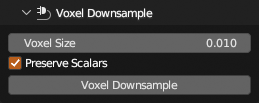
Voxel Downsample
Voxel downsampling uses a regular voxel grid to create a uniformly downsampled point cloud from an input point cloud.
It is faster than Simplify > Voxel Grid, but have less options. Choose from Open3D or PCV implementation.
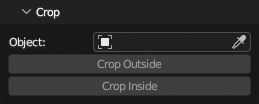
Crop
Remove points outside or inside of bounding box of a mesh object.
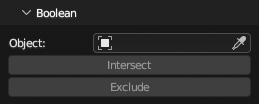
Boolean
Boolean intersect or exclude points with a mesh object.
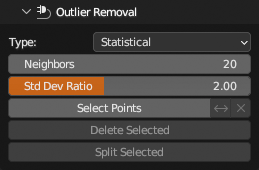
Outlier Removal
Remove points that are further away from their neighbors compared to the average for the point cloud. Useful for removal misaligned single points.
Choose from Open3D or SciPy implementation.
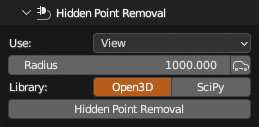
Hidden Point Removal
Estimates visible points from view or object location and removes hidden.
Choose from Open3D or SciPy implementation.
Project
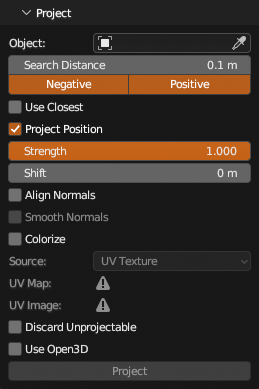
Projects points along their normals (backwards, forwards or both) on mesh surface. Points can be moved to hit location, their normal can be replaced with surface normal (optionally interpolated) and points can be colorized by mesh uv texture, color attribute or vertex group, all of these properties can be enabled individually. Can also discard points that can’t be projected. Use Open3D option can be used to speed up ray casting.
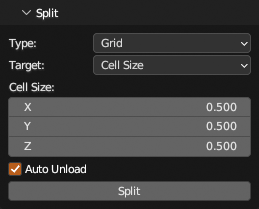
Split
Split points to multiple PCV instances. Points can be split to Grid, or by point Count per instance or to several Pieces with roughly same point count.
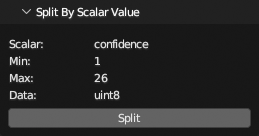
Split By Scalar Value
Split points by integer scalar field. Useful to split classified points separate PCV instance per class.
Point Set Registration
Align multiple PCV instances, selected are always aligned to active. There are several Method types to choose from.
For details on each method see Open3D documentation. Generally Fast Global is good enough, if more precision is required, use Global with Local Refinement.
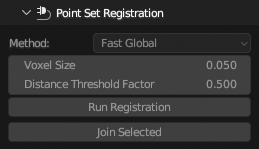
Join
Join selected PCV instances to one.

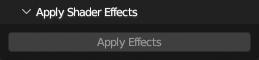
Apply Shader Effects
Apply shader Display > Effects to points.
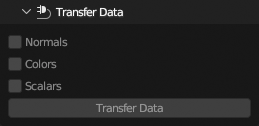
Transfer Data
Transfer normals, colors and scalars from active to single selected other PCV instance by proximity, there is no interpolation, values is taken from closest point in active instance.
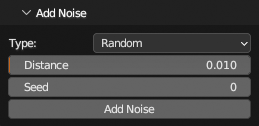
Add Noise
Apply Random or Turbulence noise to point positions.
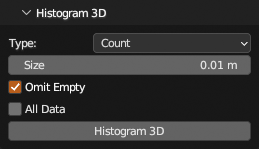
Histogram 3D
Calculate 3d histogram of points, split points to 3d cells of equal sizes and calculate number of points they contain or cell density, put result to a new PCV instance, counts or densities as a scalar field.
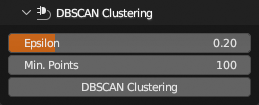
DBSCAN Clustering
Group local point cloud clusters together and add group indices as a scalar field.
Normals
Filter > Normals panel contains filters operating on point normals.
Filters are directly applied on loaded points, Blender undo system does not work. To have single history state to return to, see Store/Restore state operators

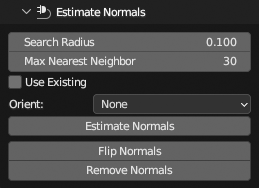
Estimate Normals
Compute normals of point cloud. Normals are oriented with respect to the existing point cloud normals if exists and provided. If not, there are several methods to determine orientation: Direction, Camera Location and Tangent Planes.
Smooth Normals
Smooth existing point normals by interpolating between neighbouring points.
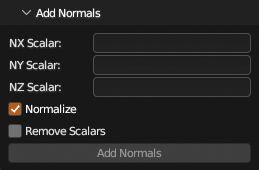
Add Normals
Add normals from three scalar fields.
Some file formats does not store normals, but allows adding of custom scalar fields. Normals x, y, z values are added, but there is no standard for field names. Most common are NormalX, nx, normal_x, normalx or normal x.
Colors
Filter > Colors panel contains filters operating on point colors.
Filters are directly applied on loaded points, Blender undo system does not work. To have single history state to return to, see Store/Restore state operators
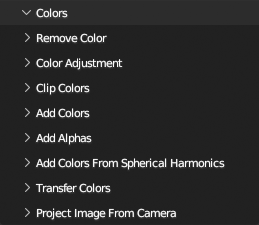
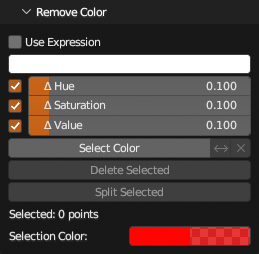
Remove Color
Select points by color sampled from viewport or by numeric values. Selected points can be removed or split to new PCV instance.
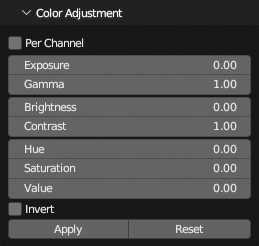
Color Adjustment
Adjust points colors with Exposure, Gamma, Brightness, Contrast, Hue, Saturation, Value and Invert controls. For fast viewport preview uses Color Adjustment shader, need to be applied with Apply button to point data.
Clip Colors
Clip color values to be between 0.0-1.0.

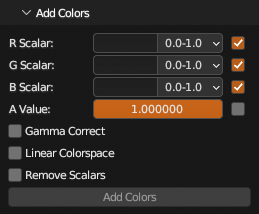
Add Colors
Recreate point colors from three (or four) scalar values. Handy when loaded data does not define known colors format and their values are read as regular scalar values.
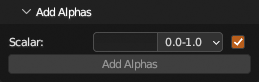
Add Alphas
Add alpha from scalar value or constant.
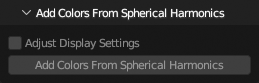
Add Colors From Spherical Harmonics
Compute colors from first level of Spherical Harmonics in 3D Gaussian Splatting files.
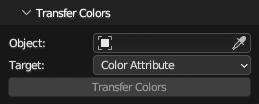
Transfer Colors
Transfer colors from points to mesh object color attribute or uv texture. By default, color is taken from closest point, optionally you can average point colors in some radius. Transfer colors to UV texture requires non-overlapping UV layout fully contained in unit square on target mesh. Extending margins on UV texture uses Blender baking system.
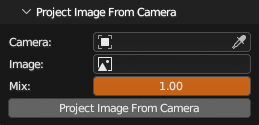
Project Image From Camera
Project colors from image on points. Perspective and Ortho cameras are supported.
Scalars
Filter > Scalars panel contains filters operating on point scalar fields.
Filters are directly applied on loaded points, Blender undo system does not work. To have single history state to return to, see Store/Restore state operators
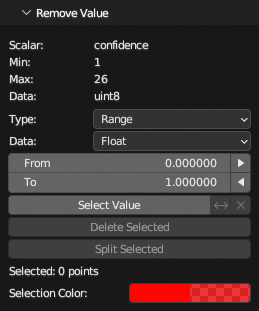
Remove Value
Select points by scalar value. Selected points can be removed or split to new PCV instance. Points can be selected by range or exact value, both integers or floating point values.
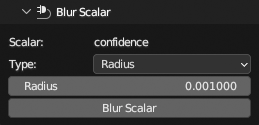
Blur Scalar
“Blur” scalar field.
Posterize Scalar
Posterize scalar field. The result is the same like using Display > Scalar Field > Posterize, but it is aplied directly on values.

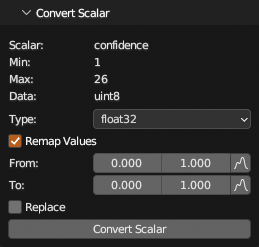
Convert Scalar
Convert scalar field data type to another, optionally remap values From to To value ranges. Result can be added as new scalar field or replace source field.
Distance To Mesh
Add scalar field from point shortest distance to a mesh.

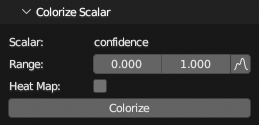
Colorize Scalar
Colorize points by scalar value, grayscale or heat map colors.
Scalar From Mesh Vertex Group
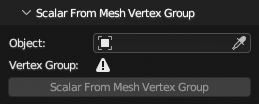
Create scalar field from mesh vertex group by point proximity.
Scalars From Mesh UV Map
Create scalar fields from mesh UV by point proximity.

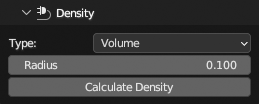
Density
Create scalar field from points density.
Neighbours- Density from point distance to closest neighbour.Surface- Density from number of other points in circle radius, in 2D, along world Z axis.Volume- Density from number of other points in sphere radius.
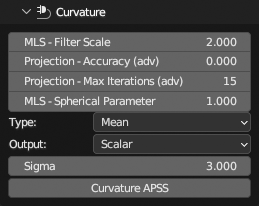
Curvature
Compute curvature on points from underlying surface and output to colors or scalar.
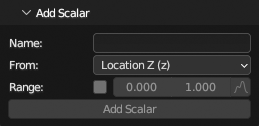
Add Scalar
Create scalar value on points from other point properties.
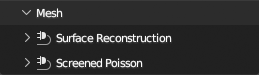
Mesh
Filter > Mesh panel contains filters for mesh surface reconstruction from points.
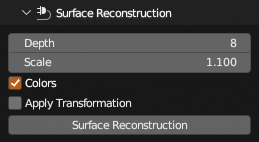
Surface Reconstruction
Uses Open3D - Poisson Surface Reconstruction
For correct results, points must have correct normals.
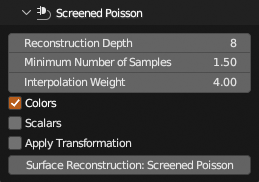
Screened Poisson
Uses MeshLab - Surface Reconstruction: Screened Poisson
For correct results, points must have correct normals.
Find Contours
Rasterize points along world Z direction, render to a texture using Point Size and Resolution, optionally Interpolate missing pixel values, compute Contours from pixel depth data in Range and Levels and add them as mesh object.
So for example, if you need contour at every 10cm in point cloud 1-2m section that has 3m total height from world origin, set Range [1.0, 2.0]m and Levels 11 (1m/0.1m + 1) (+1 to have 10 sections between 11 contours)
Render
Render with active GPU backend single or multiple PCV instances to image or sequence of images with transparent or 3d viewport background (as looks in Solid viewport shading). Points are always rendered with active shader used for drawing in viewport. Scalars, normals and bounding box is rendered if enabled and drawn in viewport. Clipping planes are used during rendering as well.
Other blender objects can be rendered together with points if Type is Viewport. They will look as in viewport.
Preset ![]() menu in panel header will save all panel settings into a preset.
menu in panel header will save all panel settings into a preset.
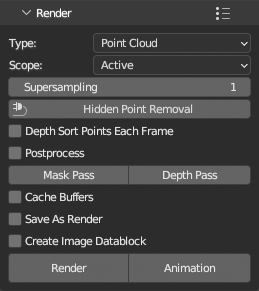
Output
Images are rendered in Properties > Output Properties > Format Resolution X,Y and % dimensions and saved as set in Properties > Output Properties > Output (image file formats only) at path at the same panel. If Save As Render is enabled, Properties > Output Properties > Output > Color Management is used. Rendered images are directly saved to output directory, they are not opened in image editor area as regular Blender renders, unless Create Image Datablock is enabled, then will render to image datablock (single render, animation is always saved to disk), consecutive renders will create new image datablock each, images have to be saved manualy or packed to blend file.
Performance
Cache Buffers speeds up animation rendering by creating buffers once and reusing for the rest of frames. Works only on static point data (no sequences) and Display properties cannot be animated, Depth Sorting and HPR cannot be used. Only container transformation can be animated.
Anti-aliasing
For anti-aliased images, use Supersampling 2 or larger. At value 2 renders image at 200% size (3 at 300% etc.) and then downsamples to output resolution. This is limited by maximal gpu image (texture) resolution so be careful with value, use the smallest acceptable, usually at 2, amount of anti-aliasing is sufficient.
Look
- If you render points with alpha per point and
Alphashader, or if you use otherGlobal Alphathen 1.0, for best result enableDepth Sort Points Each Framefor correct alpha blending. On the other hand, rendering will be slower because sorting is performed in python and not in gpu. Hidden Point RemovalrunsHidden Point Removalfilter on points on each frame using render camera location.Postprocessapplies postprocesing on renders as in viewport, but adjust setting first for rendering in Render panel. Because of different resolution, result may look different then in viewport.
Other Notes
Mask PassandDepth Passsaves separate files with mask and depth buffer.- If you start Blender from command line you can observe animation rendering progress in terminal.
- If you want to render points with Blender render engine (Cycles, Eevee or any other), points need to be converted to regular Blender object, see
Convertsection.
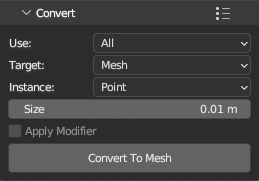
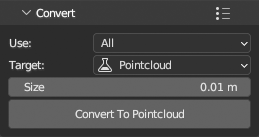
Convert
Conversion Blender object/data type is set at panel top with Target enum.
Preset ![]() menu in panel header will save all panel settings into a preset.
menu in panel header will save all panel settings into a preset.
Mesh
Convert points to native Blender Mesh datablock type. Converted points are then part of blend file and can be used like any other native Blender data. Colors, normals and scalars are always preserved. Conversion results are renderable with Cycles, Eevee and other render engines.
Added new Mesh object will have Geometry Nodes modifier that will instance selected primitive (Point, Equilateral Triangle, Quad, Tetrahedron, Cube, Ico Sphere and Custom Mesh) on mesh vertices. Simple material using color attribute from point colors will ba added to mesh.
Instance size and instance type can be later changed on Geometry Nodes modifier. To use scalar field as colors, edit material to use different attribute.
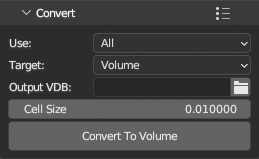
Volume
Convert points to VDB file. Set path where VDB will be saved. Operator will then add volume using exported file to scene.
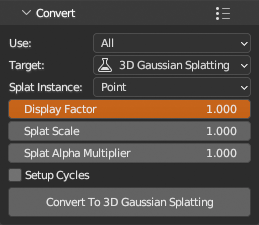
3D Gaussian Splatting
![]() Experimental
Experimental
Converts result PLY files from 3D Gaussian Splatting for Real-Time Radiance Field Rendering to something Blender renderable, keep in mind that this training software has its own terms of use. License of the original paper implementation says the official training software for the 3D Gaussian Splatting may be used “non-commercially”, i.e., for research and/or evaluation purposes only. Commercial usage requires getting license from INRIA. PCV only reads user supplied 3D Gaussian Splatting PLY files and interpret their data in Blender context. You need to consider how did you get your 3D Gaussian Splatting PLY files.
Please, take it as a very experimental feature, more like exploring what blender can do or not.
Spherical harmonics formulas used in material nodetree are taken from UnityGaussianSplatting.
Spherical Harmonics levels 0, 1, 2 and 3 can be successfully converted. Original paper uses level 3. Higher levels are not supported.
There are 4 approaches so far: points, octagons, spheres and sphere instances with volume. each have some advantages and each has problems, none is ideal.
Point- Point primitive, splat rotation and scale does not applyOctagon- Flat polygon primitive, lighter meshes, texture gradient falloff, lack of third dimension makes result look too sparse, by default has doubled size to counter thatSphere- UV sphere primitive, better shape representation, bad gradient falloff due to available surface material possibilitiesVolumetric Sphere- Instanced UV sphere primitive, volumetric material, very slow to render, volume density does not translate that well
Increasing Properties > Render Properties > Light Paths > Transparent will get rid of weird opaque patches in render.
Pointcloud
Convert to native Blender Pointcloud object. Available in Blender 4.5 and later.
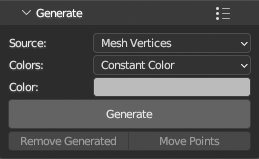
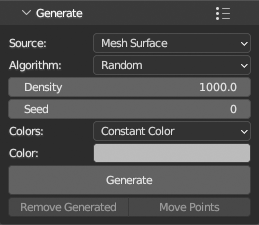
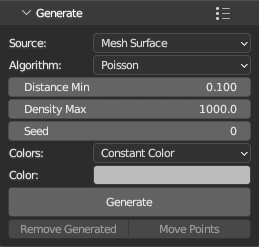
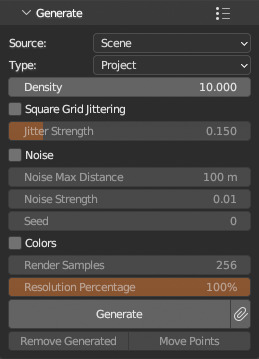
Generate
Generation source Blender object/data type is set at panel top with Source enum.
Preset ![]() menu in panel header will save all panel settings into a preset.
menu in panel header will save all panel settings into a preset.
Remove Generated operator will remove generated points and Move Points operator will move generated points from source object to a new Empty object.
Colors
Generation methods that use single object as source can generate point colors from various source found on mesh set with Colors enum.
Constant Color- Use constant color valueColor Attribute- Use active color attributeUV Texture- Generate colors from active image texture node in active material using active UV layoutVertex Group Monochromatic- Use active vertex group, result will be shades of greyVertex Group Colorized- Use active vertex group, result will be colored from red (1.0) to blue (0.0) like in weight paint viewport
Other methods that use whole scene use rendered image that is rendered automatically in background. Generation from rendered image uses image itself.
Mesh Vertices
Generate points from single Mesh object using existing mesh vertices. Each mesh vertex will became single point.
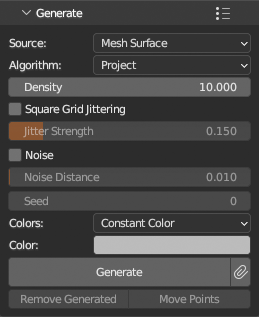
Mesh Surface: Random
Generate points from single Mesh object using random sampling of mesh surface.
Uses Geometry Nodes in background for best performance.
Mesh Surface: Poisson
Generate points from single Mesh object using poisson sampling of mesh surface.
Uses Geometry Nodes in background for best performance.
Mesh Surface: Project
Project square grid on mesh surface from view. Incremental mode is available, so consecutive runs append new points to existing. This can simulate real scanning process.
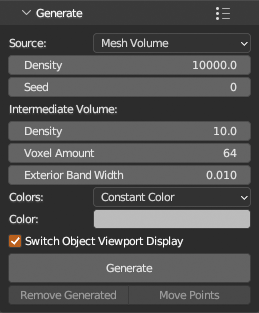
Mesh Volume
Generate points from single Mesh object using random sampling of mesh volume.
Uses Geometry Nodes in background for best performance.
Native Point Cloud
![]() Experimental
Experimental
Generate points from native Blender Pointcloud object. There are no options, Pointcloud object contains all available data.
Pointcloud object is unfinished Blender feature. It is only available in official alpha builds.

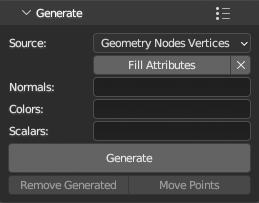
Geometry Nodes Vertices
Generate points from single Mesh object with Geometry Nodes modifier and its output.
Fill Attributes operator will help with indentifying exported attributes from modifier and setting their names them to fields.
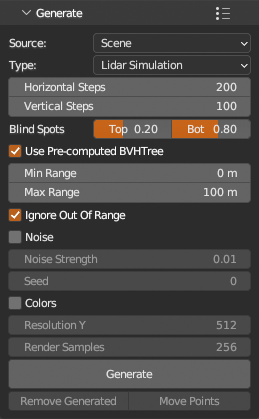
Scene: Lidar Simulation
Project points on whole scene in spherical coords around active object origin, colorize with Cycles equirectangular render rendered from origin.
Scene: Project
Project square grid on scene surface from view, colorize with Cycles render rendered from view. Incremental mode is available, so consecutive runs append new points to existing. This can simulate real scanning process.
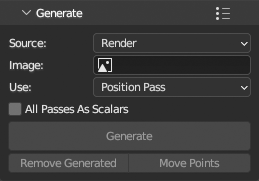
Render
Generate points from existing rendered multilayer EXR, Camera used for render and position pass or depth pass present in multilayer EXR.
Export
File type is set at panel top with Type enum.
Preset ![]() menu in panel header will save all panel settings into a preset.
menu in panel header will save all panel settings into a preset.
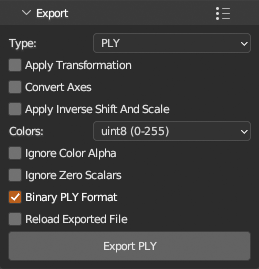
PLY
Apply Transformation- Apply container object transformation to points.Convert Axes- Convert from blender (y forward, z up) to forward -z, up y axes.Apply Inverse Shift And Scale- If point positions have Shift/Scale aplied, unapply that before exporting and use double precision in binary and 16 decimal places in ascii formats.Colors- Color data type per channel,uint8 (0-255)(typical format),uint16 (0-65535)orfloat32 (0.0-1.0).Ignore Color Alpha- Do not export color alpha.Ignore Zero Scalars- Do not export scalars with zero sum.Binary PLY Format- Write points as Binary PLY file, otherwise write ASCII PLY. ASCII PLY uses 16 decimal places for doubles and 6 for floats (applies for point positions, normals, colors and scalars as well).Reload Exported File- Write points to file, set as source file on instance, then load points from it.
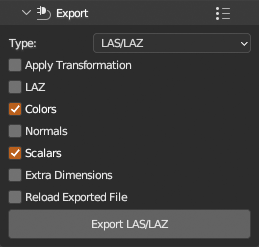
LAS/LAZ
LAS version 1.2, point format 3 and extra dimensions (normals and scalars other than standard fields https://laspy.readthedocs.io/en/latest/intro.html#point-records).
LAS/LAZ is always exported unshifted/unscaled because file format allows it.
It is always a new file, original header data (if source is LAS/LAZ) is not copied.
Apply Transformation- Apply container object transformation to points.LAZ- Write as compressed LAZ file.Colors- Write colors.Normals- Write normals if exist, extra dimensions will be used withNormalX,NormalYandNormalZnames.Scalars- Write scalar values from LAS specification version 1.2 format 3 if scalar with matching name exists.Extra Dimensions- Write other scalars as extra dimensions, any scalar with name not in specification will be written.Reload Exported File- Write points to file, set as source file on instance, then load points from it.
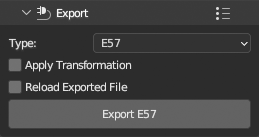
E57
Only positions, intensity (if exists) and colors (pye57 does not support normals) are exported. It is always a new file, original header data (if source is E57) is not copied.
E57 is always exported unshifted/unscaled because file format allows it.
Apply Transformation- Apply container object transformation to points.Reload Exported File- Write points to file, set as source file on instance, then load points from it.
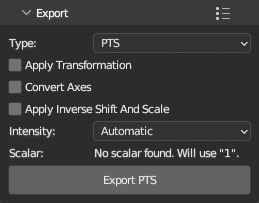
PTS
If point data has shift/scale and it is requested to be unapplied, 16 decimal places for doubles will be used, else 6 for regular floats.
Apply Transformation- Apply container object transformation to points.Convert Axes- Convert from blender (y forward, z up) to forward -z, up y axes.Apply Inverse Shift And Scale- If point positions have Shift/Scale aplied, unapply that before exporting and use double precision in binary and 16 decimal places in ascii formats.Intensity- Choose how intensity scalar is handled.Automaticuses following in order what matches: scalar field name containsintensity, active scalar field, constant value 1.
Sequence
Display sequence of point cloud files. Every file format is supported except non PTS ASCII format files.
Add new PCV instance, load first file of sequence. Then use Sequence panel to load the rest of sequence. Points from files can be Preloaded to memory for smooth playback, or loaded On The Fly. Preloaded sequence displays only current frame that need to fit in gpu memory, but the rest of loaded files is in system memory. If you run out of system memory it is better to use on the fly loading type.
If you start Blender from command line you can observe batch processing progress in terminal.
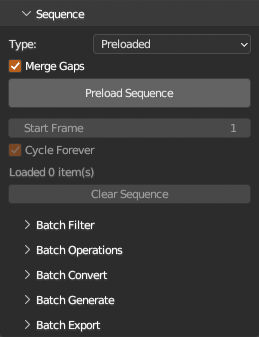
Batch Filter
Apply select filter on all loaded sequence frames. Settings for filter is taken from its panel in Filter section. Filter settings can also be animated.

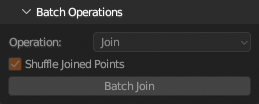
Batch Operations
Place for other operations on sequences of character that does not fall under filter category.
Batch Join: Join points per frame from multiple sequences into single sequence, sequences will be joined over whole timeline, empty frames will be skipped. IfShuffle Joined Pointsis enabled, points will be shuffled per frame.
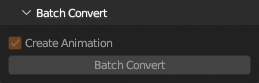
Batch Convert
Convert each frame to Blender data type as set in Convert panel. Animation hiding/unhiding frame object is created automatically so playback is preserved.
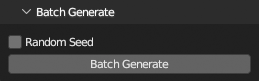
Batch Generate
Generate points for each frame in timeline with settings set in Generate panel.
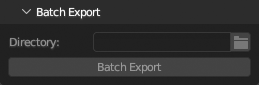
Batch Export
Export each frame to file using setting from Export panel.
Preferences
Tab Name

Tab Name- if Point Cloud Visualizer is too long for your tabs, you can change to shorter PCV.Custom Tab Name- if set to existing tan name, PCV panel is moved there.
GPU Memory To Max. Points Calculator

Calculate theoretical maximum of displayable points for given gpu memory, floored to nearest tens of millions. Result is valid only when Default shader is used and nothing else displayed, i.e. location and color per point only. See Large Datasets for more info.
Libraries
Check Environment- Helper operator that checks for legacy PCV libraries that must be uninstalledResolve Library Conflicts Using Python Subprocess- If library conflict is detected, execute operation in separate python subprocess, operation will take more time because input/output data will be written/read to/from disk in temporary directorybpy.app.tempdir
Defaults when using “PCV > Load” operator
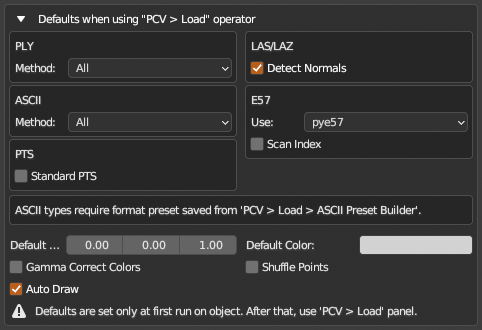
Default options for load operator: 3d Viewport sidebar > PCV tab and click Choose File ![]() .
.
Defaults when using “Add > Point Cloud Visualizer” helper operator
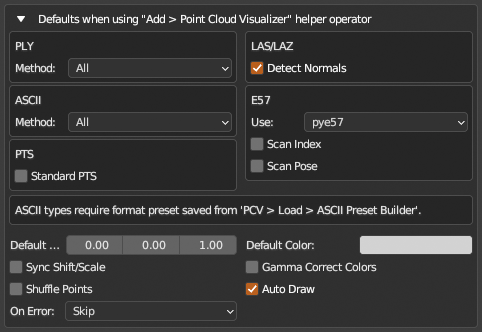
Default options for helper operator (adds empty object to scene and loads points for each selected file): 3D Viewport > Add > Point Cloud Visualizer Shift+A
Fast Navigation

Draw low resolution point cloud during viewport navigation. See Fast Navigation for more info.
Delay- Delay drawing of high resolution point cloud to viewport after navigation endedPercentage- Low resolution point cloud percentage, used until point count exceeds MaximumMaximum (Millions)- Low resolution point cloud maximum number of points, used when point count exceeds PercentageAuto Exclude (Millions)- Skip Fast Navigation if instance point count is lower, set to zero to disable and use on all instances, will not apply on points if low resolution is already generated in current session, reload files to update
Viewport

Fancy Selection Shader- Use nicer shader for selected points, uses more gpu memory - disable if that is an issueX-Ray Draw On Top- Draw points on top of everything else while 3D Viewport X-Ray is enabledSolid Alpha- Adjust alpha of X-Ray points at Solid shadingWireframe Alpha- Adjust alpha of X-Ray points at Wireframe shading
Tools

Show Help Panel At Tool Start- Disable to hide help panel for each tool.Show Tools Color Theme- Edit color theme of Tools to fit your Blender theme.
Packer

Store loaded points as hidden mesh datablock with attributes in blend file. Automatically restore and draw points from datablock at blend file load, save points to datablock on blend file save.
This operation is meant to be fully automatic (if Auto Pack and Auto Optimize options in preferences are enabled, they are by default) once loaded point data are marked for packing clicking Pack icon next to file path on main PCV panel (this will work for any file formats, even those loaded using Import panel).
If Packer is enabled, main operators (Draw, Erase, Reload etc.) will prioritize packed data (if available) over loading from ply file.
Packer adds utility operators to 3D Viewport Panel as well as list of packed datablocks in blend file. See Packer for more info.
Auto Pack: pack all points that are loaded and/or displayed when blend file is being savedAuto Optimize: remove packed datablocks on blend file save if container object is not found in scene
Utilities

Reset PCV On Active Object- Reset all PCV properties stored on active objectReset PCV Preferences- Reset all PCV Preferences
Installation
Installation
Installation is the same as Standard edition only download latest point_cloud_visualizer-pro-*version*-*platform*-*architecture*.zip (note the pro in zip name).
Platform compatibility and Blender compatibility is also the same and included libraries as well.
Upgrade
Please don’t try and install both Standard and Pro editions at the same time. Pro edition include full Standard edition anyway, so you only need to install Pro distribution zip to have both.
If you are upgrading from Standard to Pro, it is the same procedure as updating, i.e. uninstall previous, restart Blender, install new, this time latest version of point_cloud_visualizer-pro-*version*-*platform*-*architecture*.zip (note the pro in zip name).
PCV Pro: Tiles mode
Dataset on video above:
- Over one billion five hundred million points, precisely 1 505 076 907 points in 395 LAZ files
- Tile dimensions 1000x1250m, average number of points per tile 4.4 million, total size on disk 4.55 GB
- Blender 4.5 running on Mac mini Apple M4 Pro 64gb
- Tileset fully loaded with default settings except Optimize Data enabled to remove colors and scalars that are all zeros to save memory and LOD distance set slightly shorter than default
- Default Display settings, only Height shader is used (dataset has no colors) and Shade enabled
- Video is screen capture in real time
Overview
Prerequisites and Preparation
First you need a dataset that is split to individual files in a single directory. If your dataset is one single big file, you need to split it first with PCV (Tiles mode) → Tools → Split - add an empty object to scene, then go to 3d Viewport sidebar N, go to Point Cloud Visualizer tab, on top switch Mode to Tiles, Tools panel becomes accessible. See Split for more details how to use Split tools. By default the empty object will become container for Tiles instance after splitting.
If dataset is already split to multiple files you can use it as it is, or split it even further to smaller parts if overall performance is not smooth enough. Large tiles in terms of total number of points in file are slower to work with. By large is meant ~20 million points and more per file. In this case same splitting tools can be used and run in batch on whole directory of files, see Batch Split for details.
General Use
Add an Empty type object to scene (or use any other Blender object type that exists in scene), then go to 3d Viewport sidebar N, go to Point Cloud Visualizer tab, on top switch Mode to Tiles and click Select Directory ![]() , file browser will open, navigate to directory with tiles (dataset split to a grid of
, file browser will open, navigate to directory with tiles (dataset split to a grid of LAS/LAZ/E57 files) and click Select Directory button. Directory contents will be read, correct file types selected and list of tiles will be populated. Then click Draw button.
Add Menu Helper Operator
Faster and preferable way of adding PCV Tiles instance to scene is to use helper operator from Add menu: 3d Viewport header → Add or Shift+A anywhere in viewport and choose PCV: Tiles menu item. File browser will open, navigate to directory with tiles (dataset split to a grid of LAS/LAZ/E57 files), set options if needed (defaults will be set from preferences), and click Add PCV: Tiles button. Correct files will be selected from directory, tiles list populated and tiles drawn in viewport.

Main Panel and Tile List
When source directory is set and contents scanned for files, tile list is populated. Each row represent one file. To rescan directory for files, click ![]() at the end of directory row.
at the end of directory row.
![]() means tile is not loaded,
means tile is not loaded, ![]() indicates that tile linked file has been loaded.
indicates that tile linked file has been loaded. ![]() is selection status,
is selection status, ![]() marks selected tile.
marks selected tile. ![]() is tile show status, if enabled, tile contents will be drawn in viewport, if not
is tile show status, if enabled, tile contents will be drawn in viewport, if not ![]() only preview data or lowest LOD level will be used.
only preview data or lowest LOD level will be used. ![]() means tile is enabled,
means tile is enabled, ![]() means tile is disabled and will not be loaded and processed.
means tile is disabled and will not be loaded and processed.
Under list, there are two selection modal operators, Pointer select ![]() and Box select
and Box select ![]() , deselect operator
, deselect operator ![]() and
and ![]() menu with utility operators.
menu with utility operators.
If you select list item directly clicking it so it is highlighted, item is considered selected and active, if you click its ![]() button, it is considered selected. It makes difference in a few utility operators.
button, it is considered selected. It makes difference in a few utility operators.
Draw and Erase are main tile set controls, one will start processing, other will stop it. Frame TileSet will move viewport camera to frame all tiles, set viewport clip start and end to preferable range and will adjust LOD Distance of tile set according to overall dimensions.

Pointer Select
Modal operator, started by clicking ![]() button under tile list.
button under tile list.

Box Select
Modal operator, started by clicking ![]() button under tile list.
button under tile list.

Tile List Menu
Collection of utility operators working with tile list. Some can be run at runtime when tile set is loaded, some cannot.
First section contains some more framing operators. Second selection manipulation and select by tile status flags. Third section will set flags on selected tiles. Fourth section operators remove tile list items by selection or flags. Fifth exports (copies) tile files to a another directory. And last will open source directory in system file browser.

TileSet
Tile set main settings, these have direct influence on performance.
Type switches between Sequential, Parallel and Threaded. Sequential loads files in Blender Main thread, this is option for safety and stability, it is still possible to use Blender while files are loading, but interface will be laggy until visible tiles files finish loading. Parallel will load and process files in parallel, Blender interface will be locked until all is finished, but it is the fastest way to load data. Threaded will load multiple files in other threads, interface interaction will be much smoother, files will be all loaded sooner, but Blender may become unstable, it is uncertain if you will run into problems or not. Blender is not built to be thread safe, see here for more info from Blender documentation or Troubleshooting section. The best is to leave at Sequential for first load, then if dataset fits fully in system memory when loaded, switch to Parallel so next time when blend file is opened all is loaded sooner. But you may also find that Threaded in your use case is perfectly stable.
Metadata switches method of Tile linked file metadata (point count, origin and dimensions of bounding box i.e. min/max positions) retrieval.
File Header- only file header will be read directly from disk without reading point data, reading will very fast, but relies on that file header is valid and correct relative to point data, which is not always the case especially with E57 files.File Contents- full file contents will be read from disk, metadata will be exactly computed from loaded data and written to Tile properties to Blender file. First tile load will be slow, but correct, next load will use already computed values stored in Blender file. Use this option when file header values are not correct, valid or missing. If files are updated from outside, use button to remove stored values.
Pause and Resume will pause or resume loading of new tile files, tiles that already started loading will finish first.
LOD enables generating of Level Of Detail levels upon loading, if disabled, only a preview level is generated at 1% of points to be used while navigating or when tile Show flag is disabled. LOD Distance controls how levels are distributed. Imagine line at the center of 3D viewport starting at camera location, pointing in camera direction of LOD Distance length, divided in LOD Levels segments with level number assigned starting at LOD Levels down to zero at far end. If tile is in camera view and bounding box center falls into any segment, til will draw assigned level, if it is further that that, zero level is used.
Unload Hidden can help managing memory by unloading tiles that are not in view, unloading can happen after some time is elapsed or immediately, depends on Preferences settings. But unless you running out of system memory (RAM) better to leave disabled.
Optimize Data controls what is loaded from source files, see next section.
Preset ![]() menu in panel header will save all settings in all subpanels into a preset.
menu in panel header will save all settings in all subpanels into a preset.

TileSet → Optimize Data
Controls what is loaded from source files, if disabled, all available is loaded, but this will have serious impact on system memory usage. For example on screenshot there are settings that will load all points, but only keep colors and intensity scalar. Other data are not stored and point coordinates will be stored as single precision floats.
Count- Reduce point count per Tile right after loading linked fileKeep Unchanged- Number of points is not changedRandom Downsample- Points are randomly selected up toMax Pointsand the rest is removedVoxel Downsample- Points are voxel downsampled to one point perVoxel Size
Keep Double Precision- keep point positions in float64 as loaded from files, for drawing on screen, single precision - float32 is used, there is not need to keep double precision in memory, takes twice as much spaceKeep Colors- disable if dataset has no colors or colors are stored, but all zerosKeep Normals- it is very probable your dataset has no normals anyway, and so far normals are not used for anything yetKeep Scalars- disable to not store scalar values at all, enable to keep all or select fields if its name matches any of comma separated strings in field next to it

TileSet → States
Define and store tile set states. State includes tile status and selection flags and you can quickly switch between stored states. Ideal for datasets that cannot fit into memory, or to improve performance of large dataset if you need to focus to just one section of it. Using selection modal tools ![]() and
and ![]() select tiles and set flags on them as needed, click
select tiles and set flags on them as needed, click ![]() to store state.
to store state. ![]() will update already stored state with current.
will update already stored state with current.
To switch between stored states, click ![]() button,
button, ![]() means current state of tiles is identical to stored state.
means current state of tiles is identical to stored state.

States list menu with several options
Apply Selected State- same function as button
Check State Identity- enable or disable identity indication with and  , disable if ui is not as responsive as it should be
Check Identity Including Selection- enable or disable selection comparisonApply Selection From State- restore selection flag on tiles when restoring state or notClear Stored States- remove all stored


TileSet → Advanced
TileSet Type: Sequential
Load Queue- Controls how many tiles at most are loaded at the same time, if set to zero, all tiles are loaded without a break, but interface will be locked until everything is loaded
TileSet Type: Parallel
CPU Count- Controls how many CPU cores are utilized during loading, leave at zero for maximum, set to lower value to leave some cores for other tasks (not exactly per core). If set to higher value than system offers, maximum is usedLoad Everything On Draw- Load all enabled tiles even those not in view, disabled when Unload Hidden is enabled
TileSet Type: Threaded
Use Multithreading- Start multiple background threads to load files concurrently, disable to use one background thread to load one file at a time. While you will get tiles loaded faster, Blender interface will be less responsive because more work need to be done in Main thread where Blender runs (e.g. passing data to gpu). It has positive effect only when individual tiles have mostly higher point count, 500k and more. Please note, this is not multithreading as in multiprocessing, multiple threads are started, but python is processing only one thread at a time, some operations will happen concurrently, like disk I/O, but point processing will not. Some deeper changes need to be made to Blender first to support multiprocessing so even data can be processed in parallel.Threads- How many threads will be running when Multithreading is enabled, value 0 will use number of logical CPUs
TileSet Type: Any
Custom Shift/Scale lets you set specific values for shift and scale, Reset will remove custom values and will use automatic. If this is used, loaded tileset will be reloaded.
LOD Level Percentages lets you change distribution of points in levels for current LOD Levels number.
 - Set linear distribution
 - Set cubic distribution
 - Set exponential distribution
 - Validate percentages, i.e. make sure they are sorted in correct order, this can shuffle your values
- - Reset to default (cubic)
Preview Count - Force number of points for preview level, lowest LOD level if LOD is enabled, or for preview data
GPU Queue - Because “uploading” of data to GPU can happen only in Blender main thread, to minimize locking of interface, only a portion of tiles are “uploaded” at a time, this controls how many tiles are “uploaded” at once


Preferences
To open Tiles preferences, go to main Blender menu → Edit → Preferences.., choose Add-ons section from left, find Point Cloud Visualizer, expand with ![]() and scroll down to Tiles section
and scroll down to Tiles section
Engine

Budget (GB)- Total budget for all tile sets in scene in GB of gpu memory, different shaders has different requirements for point data that need to be uploaded in gpu memory, thus memory is used instead of point counts. Set it at least 25% less then available on gpu hardware to leave space for other processes, on macOS arm64 architecture with unified memory set it to 25% or less of total ram. Please note, memory is not checked from hardware, but estimated from data sent to gpuView Refresh- Tile visibility check rateContinuous Checking- Check for tile visibility only when idle (i.e. not navigating) (default, disabled state) or check continuously on every viewport change (enabled state). While continuous check will start tile loading earlier, it may also start tiles that will not be needed in the end and once file loading starts, it must complete, loading cannot be stopped from outside. Also enabling this is not recommended if Fast Navigation is disabled orSequentialorParallelTileSet type is usedUse Fast Navigation- Draw preview level resolution while navigating viewport, if disabled, current view is drawn while navigating, will refresh when you stop navigatingNavigation Delay- Delay drawing of high resolution point cloud to viewport after navigation endedUse Unload Timeout- Unload tile point data when tile is not visible (will have effect only if TileSet > Unload Hidden is enabled) after timeout has passed or if timeout is disabled, unload will happen immediately. This affects only automatic processes based on viewport, disabling or hiding tile has immediate effectUnload Timeout- Unload timeoutUnload On Hide- Unload tiles if container object is hidden from viewport (will have effect only if TileSet > Unload Hidden is enabled)Monitor System Memory- Monitor system memory while loading new data, pause loading when limit is reached to prevent freeze or crashMemory Limit- When memory is filled over limit, loading of new tiles will pause. Checks system total memory, not only portion used by tiles dataShow Statistics- Show statistics for all tile sets in viewport lower left corner
Memory Limit
If Memory Limit is reached, loading of new files is paused and message displayed in main panel and Stats. It checks total system memory minus total free memory, not just memory used by Tiles itself.


Add Helper Defaults
Lets you set defaults for Add Helper Operator, so each time it is run, these will be already set without doing anything

Tiles Theme
Here you can change colors and sizes of ui elements to fit your interface theme
Stats
Statistics for all tile sets in scene in viewport lower left corner. Shows how much of Budget and GPU memory (this is only a estimate based on what Tiles sends there) is used for current view, system memory usage, number of points displayed/loaded/total, tiles loaded/total and length of load queue and gpu queue.

Tips
3D Viewport performance tips
- make sure total point count is somewhere between 5-10 million points per file (this is just an estimate, maybe more or less on your system), if not, split further with Split tools using Batch Split to process all files in directory
- you can manually adjust
TileSet → LOD Distanceto be shorter, so only closest tiles are drawn with higher LOD level, with that you can disable to prevent it being changed back to automatic if Frame TileSet is used
 - disable tiles you don’t need to see in tiles list and use States to quickly change between stored states of tiles list
- let all tiles preload to system memory at start and have
Unload Hiddendisabled, so files are not loaded while navigating viewport, please note that by default files will be loaded until total system memory is 80% full (can be changed in preferences), then loading will pause - use Optimize Data to limit amount of data loaded, if dataset has colors but they are all zeros, disable colors, if dataset has scalars, but you don’t need them, disable all, or keep select scalar fields you need, these options can have huge impact on system memory usage and overall performance
- have and use only one 3D Viewport, while it is possible to use multiple viewports and tiles LOD levels are calculated for all viewports merged, it will lead to more points being displayed then for just one and will slow down overall performance
Other tips
- add Pointer select
 and Box select
  operators to
 Quick FavouritesQ menu, right click button and chooseAdd to Quick Favouritesto have quick access to tile selecting tools, both can also enable/disable tiles with a key shortcut while they are running, it is faster than usingTileSetmenu - automatic scalar range is set when first tile data is available, it may not be the same in all tiles, best to use selection and fit to selection if dataset is merged from various sources and range differs from tile to tile or fit to all loaded with
 when more tiles finished loading
Troubleshooting
Notes on “Threaded” TileSet type
If you experience rare random Blender crash while using TileSet → Type: Threaded, it may be caused by another installed and enabled addon that is using gpu module and custom shaders (i.e. addon that draws on screen anything with custom shaders or use shaders for gpu accelerated computing) and it does not clear GPUShader objects from memory properly once finished with them. This happens only if custom shaders are used, builtin shaders that comes with Blender, which are used the most by addon developers, are not affected by this since they are never cleared from memory.
Because Threaded Tiles are using threads to do memory heavy processing, Python may decide to run garbage collecting (clearing out no longer used objects from memory) while running other thread than main thread and when that happens, such shader object is cleared when Blender does not expect that and because shader object is not Python only object but interface to Blender internals, Blender will crash. In that case, disable all addons you don’t absolutely need for work. If you want to report that to me, please include list of enabled addons.
PCV itself is immune to this, all its custom shaders are cleared immediately after no longer in use in main thread. TileSet → Type: Sequential is not using threads at all and Parallel is using them in Blender supported way, will not cause any problems of this sort.
Similar kind of a problem may also be with other parts of Blender Python API that are closer to Blender internals, but I don’t know about that yet. If you encounter something like this, please let me know here, Message Creator button.
Notes on “E57” files
Some software writes E57 files incorrectly without bounding box (min/max positions) or does not update existing values with new after editing. This may result in error during reading file, or incorrect Tile bounding boxes. There are two ways to correct that:
- Open and save E57 files in software that will write correct header info, e.g. CloudCompare
- Switch
TileSet > MetadatatoFile Contents, slightly longer first load, then computed bounding box is stored in Blend file and used on next load
Display
Display panel contains everything related to how points are displayed in viewport. Main shader for points is chosen with Shader dropdown menu.
Preset ![]() menu in panel header will save all settings in all subpanels into a preset.
menu in panel header will save all settings in all subpanels into a preset.

Points
Points panel contains settings related to point size.

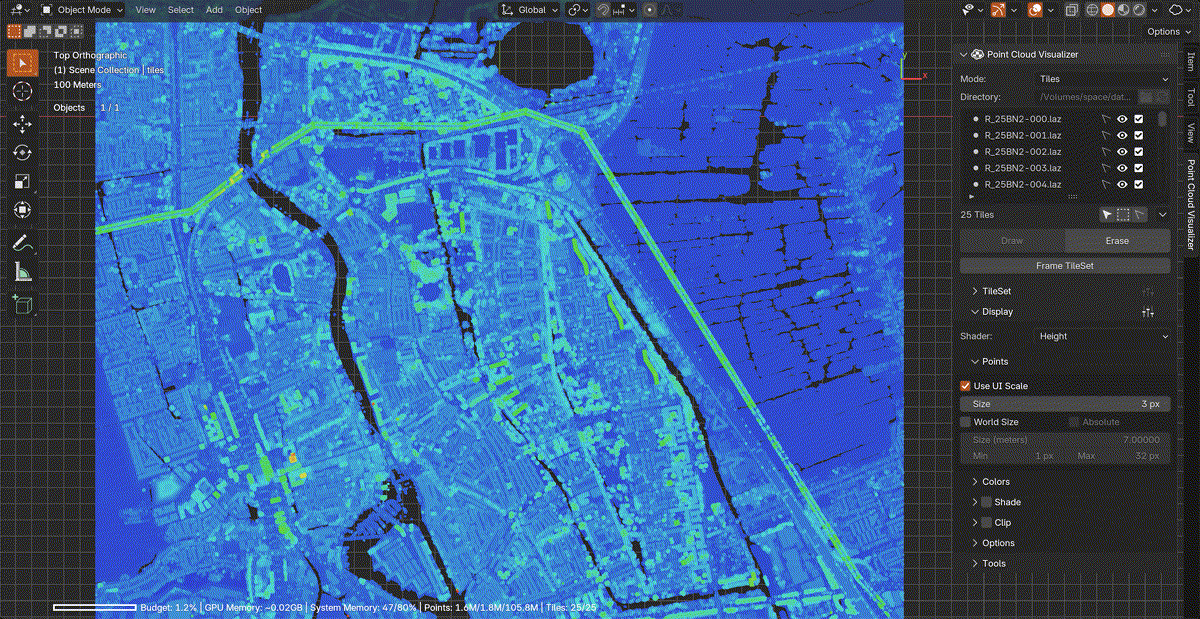
Colors
Colors panel contains settings related to point color or color generation, its content changes according to selected shader.
Colors Shader
Colors are used as they are stored in files, only converted to Blender color space (sRGB → linear). Colors can be adjusted in shader directly by enabling Use Color Adjust.
Default Color can only be changed before dataset is loaded and will be used when colors are not available in files.


Height Shader
Colors for Height shader contains axis selection, remapping options and options for custom colors. Range can be set automatically according to selected axis clicking ![]() button, values are computed from all tiles bounding boxes.
button, values are computed from all tiles bounding boxes.

Scalar Shader
Contains a list of available scalar fields, value remapping options and colorization schemes.
Range can be set automatically clicking ![]() button to set from loaded tiles or from loaded and selected tiles by
button to set from loaded tiles or from loaded and selected tiles by ![]() button. If
button. If ![]() button is pressed, range is also set when scalar field is selected in list.
button is pressed, range is also set when scalar field is selected in list.


Shade

Variant of Eye-dome Lighting, can be enabled for all shaders and is especially helpful if dataset has no colors. Works best when there are no gaps between points which depends on displayed density, point size and viewport camera view. Unlike in Standard PCV where everything drawn on screen is processed in one pass, this setting is per object only and does not break depth sorting i.e. points are not drawn over all Blender objects on top.
Because it is using depth buffer to work, it is sensitive to Blender 3D Viewport Clip Start and Clip End settings, Frame TileSet in main panel sets these to best range according to loaded TileSet dimensions.

Warning
Shade will not work on Windows and Linux with Vulkan GPU Backend in Blender 4.5 - 5.0. Change to OpenGL GPU Backend in Blender Preferences in order to make it work. Reported issue and it has been fixed. Blender 5.1 works fine with Vulkan backend.
Clip
Clip displayed points by up to 6 planes. You can control each plane individually by gizmo that is enabled by clicking ![]() button.
button.
Reset To TileSet Bounding Box will reset all planes to data bounding box, ![]() in local coordinates or
in local coordinates or ![]() in world coordinates.
in world coordinates.
Clip planes state can be saved per object clicking ![]() button and removed by
button and removed by ![]() . Stored state will be restored by
. Stored state will be restored by ![]() button on list item.
button on list item.
All planes at once, aligned to a cuboid, can be controlled with Clip Box gizmo, ![]() shows translate handles,
shows translate handles, ![]() rotate handles,
rotate handles, ![]() move box vertices,
move box vertices, ![]() move box sides and
move box sides and ![]() to move opposite faces together or in inverse direction.
to move opposite faces together or in inverse direction. Clip Box uses all 6 planes to determine its location, rotation and dimensions by intersecting planes together, if that for any reason cannot be done (e.g. 3 planes at corner does not intersect in a single point), it resets itself to data bounding box. If any plane is rotated with Clip Plane gizmo out of right angle, it will reset to data axis aligned bounding box in world coordinates. For most predictable results reset state before enabling and don’t mix both gizmos together.
You can also use any Blender Object bounding box to set planes from. If ![]() is enabled, bounding box source object can be animated and clip planes will be updated on each redraw.
is enabled, bounding box source object can be animated and clip planes will be updated on each redraw.
Set Clip Planes From Object Bounding Box will set planes from object bounding box and Set Clip Planes From Clipping Region Blender viewport Clipping Region if already set. Frame Unclipped Tiles will move and zoom viewport on unclipped points.

Clip Plane Gizmo

Clip Box Gizmo

Options
Various drawing options:
Draw Empty Tiles- not yet loaded tiles bounding boxesDraw Disabled Tiles- bounding boxes of disabled tilesDraw Selection- selection, highlight tiles selected with or tools and highlight active tile that is selected in tile listDraw Tile Labels- tile filename at tile center

Tools
Collection of tools to work with loaded dataset or to split large file to tiles and load them.

Warning
Place 3D CursorandMeasuretools will not work on Windows and Linux with Vulkan GPU Backend in Blender 4.5 - 5.0. Change to OpenGL GPU Backend in Blender Preferences in order to make it work. Reported issue and it has been fixed. Blender 5.1 works fine with Vulkan backend.
Place 3D Cursor
Modal tool to place 3D Cursor on closest point in cloud under mouse cursor. GPU accelerated. Sets only 3D Cursor location.
3D Cursor is an overlay, it is drawn by Blender behind points so it may not be visible depending on points density, this is known issue.

Measure
Measurements are created with modal tools and can be stored in blend file, edited, converted to mesh or copied to clipboard. Engine that draws measurements is independent on loaded tileset so stored measurements can be draw on screen without loaded point data.
To measure click desired tool type button and then click points in viewport to add new vertices. To store measurement click ![]() button or with SPACE key in tool. New item will be added to list. Each measurement can be split to “elements”, this is necessary for measurements that need more vertices to define, those are
button or with SPACE key in tool. New item will be added to list. Each measurement can be split to “elements”, this is necessary for measurements that need more vertices to define, those are Distance, Angle and Area (Point and Height supports this as well, but it won’t make any difference on screen). With N key you will start new element while already defined is kept and when measurement is stored, all elements are written to measurement item.
Measurement list item can be renamed clicking item label, edited with ![]() button, hidden with
button, hidden with ![]() , measurement texts hidden with
, measurement texts hidden with ![]() , on screen values switched between container local space or global space with
, on screen values switched between container local space or global space with ![]() /
/![]() and color can be set with last color picker button in row.
and color can be set with last color picker button in row.
Drawing of stored measurements on screen is controlled with Draw and Erase buttons under the list. Measurement that is being edited with modal tool is always drawn in viewport.
Point Distance and Vertex Distance values controls distance in pixels around mouse cursor to be considered when selecting point or existing measurement vertex. Best leave at default values because can cause worse performance if set too high, increase only when you have trouble selecting points or vertices.

There are several other options and operators under ![]() menu.
menu.
Use Random Colors- each new measurement will have random color instead of default when enabledUse Shift/Scale- values on screen will use values with shift/scale unapplied, this will work only if set in global space
Update To Current Shift/Scale- operator to update measurements if you change shift/scale of whole tileset after measurement is storedFrame Selected- move selected item vertices to viewMerge By Type- will merge all items of same type to one itemSelected To Clipboard- will copy values you see on screen from selected measurements to clipboardSelected To Mesh- will add new mesh object with vertices (and edges or polygons, depends on type) from selected measurement itemClear Stored Measurements- remove all stored

Measure Tools
All tools define vertices by selecting points on screen and all have similar controls. Tools have its own undo/redo system that will work only while tool is running, only adding new measurement is written to Blender history.
- LMB - create new vertex on point under mouse cursor, until you release mouse button, vertex can be repositioned
- RMB - move existing under mouse cursor
- CTRL+LMB and CTRL+RMB - will stop snapping to points
- X - remove vertex under mouse cursor if exists
- CTRL+X - will remove all current tool vertices (those not yet stored)
- N - create new “element”, in case of
Distance,AngleandAreatools, next click will start new line or polygon - F - frame last “element”
- SPACE - store measurement in list and reset tool
- CTRL(+SHIFT)+Z - undo (redo)
- ESC - exit tool
Distance and Angle tools have one more shortcut:
- C - to toggle cyclic, close line into a loop
Point
Define vertices with XYZ values.

Height
Define vertices with Z value.

Distance
Define line between multiple vertices with total length and lengths for each segment.

Angle
Define line between multiple vertices with angle between each 2 segments.

Area
Define triangulated ngon between multiple vertices with total area of triangles.

Intersect
GPU accelerated intersection between collection of mesh objects (or to mesh convertible objects) and points in tiles. Individual meshes are turned to convex hulls for intersection detection, but each object is tested individually so overall geometry can contain concave shapes. Can be executed on current scene state or on animation - then each frame is evaluated and masks are merged. Result is presented in form of point selection.
For best results use closed, watertight, preferably low poly meshes, but it can deal with non-manifold meshes, but results may not be that predictable in all cases. ![]() button next to
button next to Collection pointer dropdown will make new collection from selected objects.
Expand value can serve as safe zone around meshes, will expand collision detection distance. If animation is enabled, you can also optionally set frame range to override Blender timeline start and end. Selection Color lets you change color of selected points for better visibility.
If you start Blender from command line animation processing progress is logged in terminal.
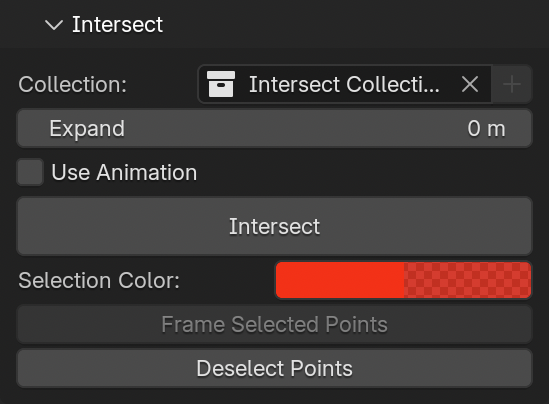

Convert
- TileSet To Standard PCV - merge all points visible and make new PCV instance loaded with the points
- Tiles To PCV Instances - make PCV instance for each tile and link tile source file to it, if some tiles are selected in list, only selected will be processed
- Tiles To Blender Pointclouds - convert all tiles to Blender Pointcloud data to be renderable, if some tiles are selected in list, only selected will be processed

Split
Example of split using Chunked Read by Dimensions, Cuboid Size: overall dimensions / 10, result is 95 files each at max 1800x1000m

Example of split using All At Once by Point Count, Count: 3 (×10⁶ = 3 000 000), result is 56 files each with max 3m points, most of the time number of points is slightly less to keep subdivision grid

All At Once
Split single file to tile files, all points from source file will be loaded, then split and pieces saved to Output directory, requires enough system memory to fit all data.
When file is selected, it’s header is read (if file format supports it) and point count and overall dimensions are displayed in panel to help deciding the rest of options. File can be split by dimensions or by max point count per file. Split by dimensions allows cube (same length in all dimensions) or cuboid (x, y, z lengths can be defined) shapes per cell. Pro Tip: for “2D” split, use cuboid shape and set Z to very large value outside of dataset dimensions, e.g. 100000.
Output format can only be LAS/LAZ/E57, LAZ is preferable because of compression and saving disk space. If source file is LAS/LAZ and output is also LAS/LAZ, original file header is reused, if not LAS 1.2 point format 3 is used.
After splitting, tiles will be automatically loaded (if ![]() is enabled) and instance settings set as per preferences (if
is enabled) and instance settings set as per preferences (if ![]() is enabled).
is enabled).
Preset ![]() menu in panel header will save your current Split settings into a preset.
menu in panel header will save your current Split settings into a preset.
If you start Blender from command line you can observe processing progress in terminal.

Chunked Read
Split single file to tile files, source file will be read in chunks, each chunk split and its points appended to initially blank files in output directory, works only with LAS/LAZ files because they allow chunked reading and writing.
Chunked read/write allows to process very large files that cannot be loaded to memory and can be faster then All At Once split type, but it is limited to maximum number of files written. OS have a maximum of concurrently opened files (typically 256), if this is exceeded, Python will fail to open (create) a new file and processing will not finish. This is set with Max Files Safeguard, default value of 100 should be safe, but decrease if you run into problems specific to your system.
After splitting, tiles will be automatically loaded (if ![]() is enabled) and instance settings set as per preferences (if
is enabled) and instance settings set as per preferences (if ![]() is enabled).
is enabled).
Preset ![]() menu in panel header will save your current Split settings into a preset.
menu in panel header will save your current Split settings into a preset.
If you start Blender from command line you can observe processing progress in terminal.

Batch Split
Split all LAS/LAZ/E57 files in Input Directory, each file is processed with active Split settings and files are written to Output Directory.
After splitting, tiles will be automatically loaded (if ![]() is enabled) and instance settings set as per preferences (if
is enabled) and instance settings set as per preferences (if ![]() is enabled).
is enabled).
If you start Blender from command line you can observe processing progress in terminal.

Advanced
Debug Mode
Is enabled when Blender is started from command line with --debug-value 18077 argument or you can set this at runtime by searching for Debug Menu and setting value 18077 in popup menu.
If Debug Mode is enabled, PCV will log more info to a console (terminal window, not Blender Info panel). In some cases even operation progress. PCV panels will also get several extra buttons to force shader rebuilding, debug options, some more panels with runtime info etc.
API
A few utility functions are re-exported at PCV module level to aid with general script or addon development. If there is problem with function input, error will be logged to console, but all exceptions will be handled to not interrupt main script from running.
Becase of Blender Extension system, importing PCV in user code is:
import bl_ext.user_default.point_cloud_visualizer as pcv
user_default being repository directory name where PCV is installed, user_default is Blender default.
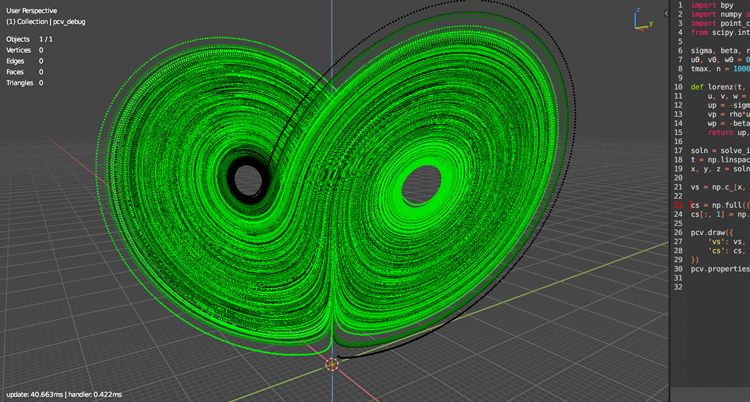
draw(data=None, *, name=None, matrix=None, is_debug=False, )
- Draw data with pcv
- data: dict with
vs,ns,csandscalarskeys (all optional exceptvs) with numpy arrays as values, all of them must have the same length, shapes of arrays must be:vsandns(n, 3),cs(n, 4) or (n, 3) andscalarsmust be a structured array (n, ). ifNoneis passed instead of a dict, empty arrays will be used, nothing will be drawn, but pcv will be initialized - name: string, assumes object is in scene, if not raises error, if
Noneis passed,pcv_debugobject will be created if needed and drawing mode is set to debug (is_debug=True) (i.e. bigger points, drawn on top, normals visible if exists, fast nav disabled..) - matrix: if not
None, target object will get assigned this matrix tomatrix_world, if not instance of Matrix, it will be converted (if possible, if not, will be ignored) - is_debug: if True, some for-better-visibility properties will be adjusted, see source for details, also set to True when no object name is passed (and
pcv_debugis used instead)
- data: dict with
draw_file(filepath, *, name=None, matrix=None, is_debug=False, )
- Draw point cloud file with pcv
- filepath: string, absolute path to PLY, LAS, LAZ, E57 or PCD file
- name: string, assumes object is in scene, if not raises error, if
Noneis passed,pcv_debugobject will be created if needed and drawing mode is set to debug (is_debug=True) (i.e. bigger points, drawn on top, normals visible if exists, fast nav disabled..) - matrix: if not
None, target object will get assigned this matrix tomatrix_world, if not instance of Matrix, it will be converted (if possible, if not, will be ignored) - is_debug: if True, some for-better-visibility properties will be adjusted, see source for details, also set to True when no object name is passed (and
pcv_debugis used instead)
properties(*, name=None, )
- Get property group with pcv properties
- it is the same as
bpy.context.scene.objects[name].point_cloud_visualizer - name: string, assumes object is in scene, if not raises error. if
Noneis passed,pcv_debugname will be used
- it is the same as
erase(*, name=None, )
- Stop drawing and unload data
- if name is
None,pcv_debugname will be used, if such object is found and isEMPTYtype, will be removed - name: string, assumes object is in scene, if not raises error. if
Noneis passed,pcv_debugname will be used
- if name is
Basic Example
import numpy as np
import bl_ext.user_default.point_cloud_visualizer as pcv
# will create `pcv_debug` empty object in scene, to use existing object pass `name="OBJECT_NAME"`
pcv.draw(data={
    'vs': np.array([(0, 0, 0), (0.1, 0, 0), (0.2, 0, 0)], dtype=np.float32, ),
}, )
Full Example
import bpy
import numpy as np
import bl_ext.user_default.point_cloud_visualizer as pcv
from mathutils import Matrix
# add an empty object
o = bpy.data.objects.new("points", None)
bpy.context.view_layer.active_layer_collection.collection.objects.link(o)
# craft some object level transformation
m = Matrix.LocRotScale((0.1, 0.2, 0.3), Matrix.Rotation(np.pi / 4, 3, 'X'), (1, 1, 1))
# scalars got to be a structured array with named fields
sc = np.empty(3, dtype=[('intensity', np.float32, ), ])
sc['intensity'] = np.linspace(0, 1.0, 3)
pcv.draw(name='points', data={
    'vs': np.array([(0, 0, 0), (0.1, 0, 0), (0.2, 0, 0)], dtype=np.float32, ),
    'ns': np.array([(-1, 0, 0), (0, 1, 0), (0, 0, 1)], dtype=np.float32, ),
    'cs': np.array([(1, 0, 0, 1), (0, 1, 0, 1), (0, 0, 1, 1)], dtype=np.float32, ),
    'scalars': sc,
}, matrix=m, is_debug=True, )
Context Manager
Context manager for running PCV operators from custom scripts
Will make sure that name object exists, has loaded points in cache and drawn on screen (if not, tries to load linked file if possible), object is selected and active and operators are called with proper context.temp_override (i.e. 3d viewport exists, if not it will swap area, this is especially important when running render operator). On exit it will restore selection and original area (if has been swapped before).
Example (assuming there is an object named points in scene with linked file and (maybe) loaded points):
import bpy
import bl_ext.user_default.point_cloud_visualizer as pcv
with pcv.common.PCVOperatorContextManager('points'):
    bpy.ops.point_cloud_visualizer.render()
FAQ
PCV License
PCV is released under GNU General Public License, version 2 or later. See LICENSE text file in extension zip for full text.
PCV Updates
Legacy customers who purchased before Superhive Support Period was introduced (Monday, 22 June 2026) will receive updates as before. Thanks for your support and contribution to the development. If you would like to enroll to Support Period to support development more, please message me on Superhive for a substantial discount code.
New customers will be gettting 12 months of Superhive Support Period. Read more about and how it works here: Support Period FAQs For Customers. Price for extending support and access to new updates to another 12 months uses lowest possible setting, 25% of original price.
PCV Support
I provide support for all legacy customers (before Superhive Superhive Period) and new customers with active Support Period. For customers with expired Support Period, maybe..
To contact me, go to Superhive, log in to your account, go to PCV store page and click Message Creator button.
Platform Compatibility
- Windows (x64), Linux (x64) and macOS (arm64 & x64)
- macOS x64 (Intel Architecture) version is provided, but not tested
Blender Compatibility
As a general rule, using latest Blender LTS release is the best, at the time of writing it is Blender 4.5 LTS, latest LTS is used for development and will be the most tested Blender version
- Blender 4.2.6 LTS or later
- Blender 4.3 may not work because issue with installation that has been fixed after its release
- Blender 4.4 or later will be compatible, up to Blender 5.0
- for Blender 5.1 use distribution zip with
-blender-5.1suffix and see notes on Blender 5.1 bellow
Notes on Blender 5.0
- PCV is fully compatible on macOS with Metal gpu backend and on Windows/Linux with OpenGL gpu backend
- on Windows/Linux with Vulkan gpu backend, there is minor issue that has been fixed in Blender 5.1 (it is not clear if fix will be backported to Blender 4.5 LTS), this issue affects viewport postprocessing, Tiles shading and modal tools that depends on point selecting, if you switch gpu backend to OpenGL and restart Blender, all will be working as intended. Blender 5.1 works fine with Vulkan backend.
Notes on Blender 5.1
- Blender 5.1 comes with major changes relevant to extensions, Python version went from 3.11 to 3.13 and Numpy from 1.x to 2.x and all libraries that use compiled code need to be budled for new Python and all of them need to support new Numpy
- At the moment, only
Open3Dis not yet officially released for Python 3.13 and it is not bundled in PCV so features that depends on Open3D will not work - To install PCV in Blender 5.1, you need to download and install distribution zip for Blender 5.1 (
-blender-5.1suffix), regular distribution zip will refuse to install
Notes on Blender 5.2
- When Blender 5.2 LTS will be released, PCV for macOS x64 (Intel Architecture) will no longer be updated and will be available only as legacy version for Blender 4.5 LTS
Are all filters and tools from Standard edition available also in Pro Tiles mode?
No. Tiles mode has its own set of tools. More will come in future updates.
I got warning icons and Missing vertex normals, Missing vertex colors and Missing scalars messages in Display panel
Loaded data does not have normals, colors or scalar fields so affected shading options cannot work properly, missing values are substitued by default normal or colors (exact values are in PCV > Load > General).
My LAS/LAZ file is all black even though i know it has colors
Some software may save colors incorrectly as 8bit values per channel (0-255) in 16bit fields (0-65535). LAS specification uses only 16bit colors and 8bit values are very close to zero when interpreted as 16bit, so colors look almost black in viewport. To fix, go PCV > Load > Reader Options, check Force 8-bit Colors and click Reload in PCV > Load panel. File will be reloaded and colors interpreted as 8bit. This will only happen when all color channels values on all points are between 0 and 255 which indicates incorrectly saved LAS/LAZ.
Points are missing when blend file is saved and reopened?
- PCV does not store loaded points in blend file because there is no suitable data type available. only PCV settings and path to data file is stored. when blend file is reopened, points need to loaded or imported from linked file again by clicking
Drawbutton. - If you are working with multiple PLY clouds at once, you can use PCV 3d viewport panel (viewport header top right corner: cloud icon) to
Drawall PCV instances in scene at once. - Any changes to points made with PCV have to be saved using Export panel to PLY before quiting Blender or loading blend file otherwise will be lost.
- Other option is to use
Packoption that will automatically convert points to hidden mesh datablock on blend file save and restore on blend file load, but since blender uses only single precision floating point numbers for vertex positions, geolocated point data will lost its precision and cannot be moved exactly back. If you don’t need to export points back to “world” locations (i.e. LAS/LAZ or E57 files) you can ignore this limitation.
How to render points in Cycles or Eeveee (with colors)?
- Points need to be converted to Blender native data type that can be rendered in engine. Conversion target is mesh vertices with Geometry Nodes to turn them to instances or points, see
PCV > Convertpanel. - Converting points will create suitable color data and adds basic material using it so colors are preserved and available for render engine.
- Mesh instances can be rendered in Cycles and Eevee, points are supported only by Cycles, Eevee converts them internally to mesh before rendering so it can be slow.
Large Datasets
- currently, PCV needs to load all points from source file and keep them in system memory
- during loading, system memory usage will peak quite high, 4 (and more in some cases) times the runtime usage
- for display, PCV need to upload all points that are going to be displayed (you can control amount with
PCV > Display > Percentageslider) to gpu memory - to determine approximate maximum number of points your gpu can display at once you can use calculator in PCV preferences (for example 8GB gpu can display ~300M points with default shader and disabled scalars), calculator formula is simple:
ram = 8192  # MB
b = (1024*1024) * ram  # bytes
# default shader uses 3x float32 for point location and 4x float32 for color (rgba)
# float32 takes 4 bytes, hence 3*4 + 4*4 bytes
n = int(b / (12 + 16))
print(n)  # 306783378
- trying to display more points (i.e. uploading more data than gpu memory can contain) will result in Blender crash or freeze
- when extremely big data need to be loaded and is not required to work with exactly all points, alternative loading methods
Every NthorSlicecan be used to reduce number of points during loading
Is there a trial version?
No, sorry. it is not possible.
I got an error..
Please let me know “Ask a Question” sidebar button.
Ideal for any bug report would be starting Blender from command line and repeating error situation. Then copy messages from console window, add steps to reproduce it. If it is related to loading a point cloud file include it in report if it is possible.
I’d like to have X feature implemented..
Please let me know “Ask a Question” sidebar button. I am always open to suggestions.
Change Log
2026
3.10.0
- Standard alternative fast implementation of
Voxel Downsamplefilter not depending on Open3D (still not available for python 3.13 in blender 5.1 and later). - Pro
Voxel Downsampletiles upon loading (using same fast library), available together withRandomunderOptimize Data > Countin TileSet panel, or add helper operator and its preferences. Allows loading of even more massive datasets with being relative easy on processing while viewing if you don’t absolutely must view all points. Downsampling is run just after file is loaded and only downsampled points are kept in memory. Voxel downsampled points also look better than random choice and works nicely withWorld Sizeadded in PCV 3.9.0. - Pro new TileSet option
Metadata, defaultFile Headerworks as before, file bouding box is loaded from file header without reading point data, newFile Contentsmethods reads full file, computes bounding box and writes to blender file so next time tile is loaded processing can be skipped. If so far everything worked for you, no need to change anything, but if you got dataset that have wrong values in file headers, especially in E57 files (many software don’t bother writing or updating headers with correct values after editing), this option will fix this problem. Also this new option fixes problems with E57 files without(x|y|z)Minimum/(x|y|z)Maximumheader fields and with updatedpye57(see bellow) both common E57 problems should be fixed. - Standard new
Display > Points > Fast Nav Size Factor- increase point size when viewport is navigated for better visibility ifBlender > Preferences > Addons > PCV > Fast Navigationis enabled. - Pro new
Display > Points > Fast Nav Size Factor- increase point size when viewport is navigated for better visibility ifBlender > Preferences > Addons > PCV > Tiles > Fast Navigationis enabled. - Minimum Blender version is now 4.5 and this is (possibly) last macOS x64 release, mac intel architecture was deprecated with Blender 4.5.
- Updated
pye57to latest version, removed option to patch pye57 at runtime to handle missing rotation and translation in scan header because new version handles that by itself. Option from PCV preferences is removed along whole experimental section. Again as before,pye57for macOS x64 is built by myself from source and not tested.
3.9.0
- Standard and Pro reworked points display
Adaptive SizetoWorld Size, now works the same in both perspective and orthographic projections, points are scaled with container (default) or stays same absolute size. Intended workflow is: enable, adjustSizeuntil points sizes covers gaps between points (depends on dataset) and enjoy much more details when zoomed out and no/less gaps when zoomed in. Please note, gpu hardware clamps rasterized point size to some pixel size (typically 64 or 128 pixels), so when zooming in, points will stop upscaling at some point, that is also why min and max size are possible to set in ui to make it predictable. - Standard alternative SciPy implementation of
Outlier Removalfilter, bothStatisticalandRadiusmethods.Statisticalis almost as fast,Radiusis a tiny bit slower. Does not depend on Open3D and is available in Blender 5.1+ - Pro fixed point selection shader running in background in modal tools (
3D CursorandMeasure) sometimes refusing to identify random points. - Standard and Pro Blender 5.2 compatibility, accessing Geometry Nodes modifier properties has changed. Many of operators in
ConvertandGenerateuse intermediate Geometry Nodes engine to accelerate processing or output Geometry Nodes.
3.8.0
- Standard new helper operator
Tools > Retopology > Project Vertices To Pointsto project all mesh vertices in view to points from viewport camera and snap to them. - Standard fixed error in blender 5.0+ when rendering animation with
Cache Buffersenabled.
3.7.0
- Standard ability to read individual scans from E57 files, thus product of
Expandoption inAddoperator can be reloaded on Blender restart. In order for it to work properly, empties that contain individual scans should not be transformed (they are created with transformation locked), only main, parent, empty object should be transformed. - Standard E57 scan index can be also set manually in
Load > Reader Optionspanel, but file is not checked in advance for contents, so if scan at index does not exist, you’ll get error message. - Standard fixed pointcloud to volume conversion.
- Pro new Tools > Intersect, gpu accelerated intersection between collection of mesh objects (or to mesh convertible objects) and points in tiles, individual meshes are turned to convex hulls for intersection detection, but each object is tested individually so overall geometry can contain concave shapes. Can be run on current scene state or on animation, then each frame is evaluated and masks are merged. Result is presented in form of point selection (so also new point selection framework for future tooling is now implemented).
- Standard and Pro known issue in Blender 4.5 (possibly earlier as well) to 5.0, Windows and Linux, Vulkan GPU backend, Pro
Tiles > Display > Shadedoes not show shading and Standard3D Viewport Menu > Postprocesscauses all points to disappear, reported, fixed in 5.1 https://projects.blender.org/blender/blender/issues/154184, so far it is unclear if fix will be included in next 4.5 LTS. OpenGL GPU backend is not affected, to fix, switch to OpenGL inBlender > Preferences > System. Blender 5.1 works fine with Vulkan backend. - Blender 5.1 compatibility: Python version has been updated to 3.13 from 3.11, this requires all new wheels for all libraries, at the moment, all are available except Open3D, hence multiple release zips.
Blender 5.1 PCV variant is without Open3D and following features (all from Standard variant/mode, Pro does not use Open3D for anything) will not work, operators should complain about Open3D not being installed if executed (if not, it is a bug).
| Feature | Workaround |
|---|---|
| Render > Hidden Point Removal | SciPy implementation can be used instead |
| Filter > Points > Voxel Downsample | Filter > Points > Simplify > Voxel Grid can be used instead |
| Filter > Points > Outlier Removal | |
| Filter > Points > Hidden Point Removal | SciPy implementation can be used instead |
| Filter > Points > Project (Open3D Accelerated) | will work without acceleration |
| Filter > Points > Point Set Registration | |
| Filter > Points > DBSCAN Clustering | |
| Filter > Normals > Estimate Normals | |
| Filter > Normals > Smooth Normals | |
| Filter > Mesh > Surface Reconstruction | Filter > Mesh > Screened Poisson can be used instead |
3.6.0
- Standard and Pro new
Clip PlaneandClip Boxgizmos - Standard and Pro new
Clip Planes StatesUI inside Display > Clip - removed Tools > Clip Planes (functionality replaced by gizmos)
- Standard new
Smooth Normalsoperator, interpolate existing normals with neighbours within distance and max count - Pro fixed Tools > Split UI bug that prevented running split e57 to las/laz
2025
3.5.0
- Pro new tileset type
Parallel. Tiles are loaded and processed in parallel. UI will not be responsive until loading is fully finished. Fastest, but non-interactive- 1.5gp (that’s “gigapoint”) dataset:
Sequential2:27,Parallel0:49, (Threaded1:12)
- 1.5gp (that’s “gigapoint”) dataset:
- Pro
Defaulttileset type renamed toSequential - pcv debug mode now requires specific debug value to be set so it does not interfere with blender builtin values
3.4.0
- new PCV Pro with Tiles mode
- new option
Lumain Filter > Scalars > Add Scalar
3.3.2
- matcaps - blender 5.0 ships with matcaps as multilayer exr files. there is no reliable python api to load all/specific layers from such exr files as pixel arrays, so rather then remove feature, copy exr files from older blender system directory e.g.
4.5/datafiles/studiolights/matcap/*.exrto user directory5.0/scripts/presets/point_cloud_visualizer/matcaps/*.exr(more info about blender directory layout) and then they will show in matcap menu as before. if target directory is empty, one matcap (CC0 / public domain as per info here) is bundled in pcv, so menu is not empty and warning is displayed - more small blender 5.0 fixes here and there
- increased
display > points > adaptive point sizemaximum, handy with very large datasets with relatively sparse points
3.3.1
- fix Trace tool vertex reposition without snapping if points container is transformed
3.3.0
- new Retopology >
Tracetool for tracing flooplans, use clip planes to clip points vertically to narrow outline, then you can create lines or polygons with Trace tool while snapping to points (or move freely if points are missing), by default points will be in fixed height along global z axis set by first added point or existing in linked work mesh, lines can be cyclic or open, cyclic can be filled. Until line/polygon is commited, its points can be moved around (with or without snapping to points), once commited, can’t be edited, but key shortcut to jump into mesh edit mode exists to enable editing of commited lines. - new e57
Expandoption forAddoperator, makes empty for each individual scan in e57 with its associated points (currently, you cannot save that back to e57, and unless you save each scan individually to a file, you won’t be able to load points back on Blender restart) - Blender 4.5 compatibility, initial Blender 5.0 compatibility. but use in 5.0 at your own risk
- convert to native pointcloud object in Blender 4.5 and later (finally python api call is available in Blender release builds)
3.2.2
- LAS/LAZ:
Force 8-bit Colorsoption to load correct colors from LAS/LAZ files that has been saved incorrectly with 8bit values in 16bit fields. Without this enabled, points would appear almost black on screen. Available in Add and Load operators and in Load > Reader Options panel. It is aplied only if enabled and all rgb color fields are uint16 dtype and have all values less or equal 255.
3.2.1
- shader workaround for blender 4.4 and later https://projects.blender.org/blender/blender/issues/138928
3.2.0
- new filter > mesh > Find Contours: Rasterize points along world Z direction, render to a texture using Point Size and Resolution, optionally Interpolate missing pixel values, compute Contours from pixel depth data in Range and Levels and add them as mesh object. So for example, If you need contour at every 10cm in point cloud 1-2m section that has 3m total height from world origin, set Range [1.0, 2.0]m and Levels 11 (1m/0.1m + 1) (+1 to have 10 sections between 11 contours)
- if viewport shading is solid or wireframe and X-Ray is enabled, override drawing for points to be on top with 0.5 alpha to mimic blender viewport drawing. this behavior can be turned off, or alpha can be adjusted in pcv preferences,
Viewportsection. setting alpha to 1.0 will look like in blender < 4.3, there was a change in blender overlay engine in 4.4, hence this setting - fix: Render error when supersampling is used together with adaptive point size
3.1.2
- Convert > Gaussian Splatting: added support for Spherical Harmonics levels less than 3, so levels 0, 1, 2 and 3 can be now successfully converted
- fix Convert operator nodetree set boolean error in blender 4.4
3.1.1
- drag and drop for add pcv helper operator, only .ply, .las, .laz, .e57 and .pcd files, ascii types are not supported for drag and drop
3.1.0
- extension, required blender >= 4.2.6
- all libraries bundled, distribution split to platforms (while i provide mac intel package, i cannot test it, my intel mac is too old to run blender 4.0+), libraries wheels (except pye57 for mac intel, that one is built by me, because official is not available) are downloaded from PyPI (except pymeshlab until blender is fixed, see known issues)
- updated libraries to latest (almost)
- added automatic system for handling open3d conflicts on windows, data is saved to disk, separate python process is launched and results are collected back to blender, slower to run, but prevents freezes and crashes, no need to save e57 and laz files to ply and restarting blender anymore
- removed pymeshlab based e57 reader, pye57 is now officially available for mac arm64 and it is now the only way to read e57 files on all platforms
- removed laszip (no mac arm64 wheel, conflict with open3d on windows, laspy prefers lazrs anyway), lazrs is now they only way to read laz files
- fast navigation is now enabled by default, can be disabled in add helper defaults or globally
- both open3d and pymeshlab surface reconstruction freeze on arm64, automatic workaround is available, it is only a bit slower to execute
- removed experimental viewer
- becase of extension system, importing pcv in user code is now:
import bl_ext.user_default.point_cloud_visualizer as pcv,user_defaultbeing repository directory name where pcv is installed - updated deprecated nodes in all geometry nodetrees
- fixed filter select points by color not using delta value properly
2024
3.0.2
- various small fixes
3.0.1
- fix: tool help panel visibility is now persistent whole blender session. if you don’t need it,
Hto toggle it off and it will stay off when next tool is run
3.0.0.17 (alpha)
- docs: https://jakubuhlik.com/docs/pcv/
- new:
Transfer Datafilter - Transfer data from active to (single) selected PCV instance (object) by proximity, there is no interpolation, value is taken from closest point in active instance - fix: auto radius in scipy based hidden point removal
3.0.0.16 (alpha)
- new
Hidden Point Removalalternative implementation usingSciPy(instead ofOpen3D) as filter operator and render function - faster voxelize option in filter > simplify > type: voxel grid, will sort points to 3d grid and then throw away all, but one point from each cell
- slightly easier on eyes default colors in
Heightshader - optional libraries - updated support for their latest versions (that also means Blender 3.6 LTS is minimum now)
- Open3D 0.18.0 (so it available for python 3.11 that is shipped with blender 4.1+)
- lazrs 0.6.0
- pye57 0.4.5
- PyMeshLab 2023.12.post1 (e57 reader is not backward compatible)
- to update library, click
Install NAMEbutton in pcv preferences, then restart blender
3.0.0.15 (alpha)
- new:
Project Image From Camerafilter - Create points colors from projected image through camera (only Perspective and Orthographic types are supported), selected image is cloned and resized to render resolution before projection - new: four color schemes for scalar fields,
Viridisis now default- http://bids.github.io/colormap/
- https://github.com/BIDS/colormap/blob/master/colormaps.py
- original color schemes are released under a CC0 “no rights reserved” license
- new:
Custom Colorsscheme for scalar fields- ui for list of colors, shader will interpolate color between them according to scalar value
- add template as steps between two colors operator
- custom colors list is included in
Displaypreset and another preset saving menu is added toScalar Fieldsubpanel for scalar field display options only - cistom colors will also synchronize with
Synchronize Shader Propertiesoperator in3D Viewport Panel
- new:
PosterizescalarDisplay > Scalar Field- in shader posterization, only on screenFilter > Scalars > Posterize Scalar- as a filter that add a new posterized uint8 scalar field- if settings are the same, both produce identical result, so shader can be used as preview for filter
- fix: if
Addmenu operator is used withSync Shift/Scaleoption enabled orSync Shift/Scaleoperator (PCV > Load > General) is run after on pcv instances, results are now stored asCustom Shift/Scale, that means shift/scale values are stored in container properties and saved to blend. so, on blend file reload (and/or point cloud source reload) custom shift/scale is used and points will appear where they were before and not reset to their individual centers like it was before (and you don’t have to run sync again)..
3.0.0.14 (alpha)
- new: Tools >
Clip Planes: manipulate clip planes visually with gizmos, store/restore clip planes states (states are saved to blend file and can be restored without tool running) - new: all Tools now on
RMBcancel current action in progress (3d cursor and all selection tools were changed) - gpu: reduced number of uniform buffers (was running out of available slots (ubuntu + nvidia driver))
- fix:
Renderoperator error on windows platform whenHidden Point Removaloption was enabled
3.0.0.13 (alpha)
- updated
laspyto latest version (click install button in preferences to update) - added button in preferences to install
lazrs- laz filelaspybackend, faster and available also for arm macs- if both
laszipandlazrsbackends are installed,laspywill preferlazrs, otherwise will use which one is available
- if both
- new api for drawing from python
- some small changes and optimizations to internal data storage
3.0.0.12 (alpha)
- new
Fast Navigation- Draw low resolution point cloud during viewport navigation- to be enabled in pcv preferences, it is off by default for now
- during viewport navigation, normals and bounding box drawing is skipped, there rest of shading options is kept, selection is always drawn in full
- a few other options in preferences
Delayset to what is comfortable, too short might interfere with overall smoothness of navigationAuto Excludepoint clouds with less than set points will not use itPercentageandMaximumcontrols how large is subset of points, set percentage of points is taken, if it is larger then maximum, maximum is used. please keep it low..- each PCV instance can be excluded by unchecking
PCV > Display > Options > Use Fast Navigation
- some implementation notes: Blender API has no way to tell if user is navigating viewport (well, at least without using modal operator and that is not applicable in this case) so solution involves timers and because of that, when you are still navigating, but pause any movement a bit, high resolution will be drawn after delay and also first redraw when you just started navigating might lag a bit, API does not provide mouse events so i cannot react before view is really changed
- new
Convertto3D Gaussian Splatting- converts result PLY files from 3D Gaussian Splatting for Real-Time Radiance Field Rendering to something Blender renderable, keep in mind that this training software has its own terms of use. License of the original paper implementation says the official training software for the 3D Gaussian Splatting may be used “non-commercially”, i.e., for research and/or evaluation purposes only. Commercial usage requires getting license from INRIA. PCV only reads user supplied 3D Gaussian Splatting PLY files and interpret their data in Blender context. You need to consider how did you get your 3D Gaussian Splatting PLY files.
- please, take it as a very experimental feature, more like exploring what blender can do or not
- spherical harmonics formulas used in material nodetree are taken from https://github.com/aras-p/UnityGaussianSplatting/blob/main/package/Shaders/GaussianSplatting.hlsl#L134
- there are 4 approaches so far: points, octagons, spheres and sphere instances with volume. each have some advantages and each has problems, none is ideal
- “Point” - Point primitive, splat rotation and scale does not apply
- “Octagon”- Flat polygon primitive, lighter meshes, texture gradient falloff, lack of third dimension makes result look too sparse, by default has doubled size to counter that
- “Sphere” - UV sphere primitive, better shape representation, bad gradient falloff due to available surface material possibilities
- “Volumetric Sphere” - Instanced UV sphere primitive, volumetric material, very slow to render, volume density does not translate that well
- increasing
Properties > Render Properties > Light Paths > Transparentwill get rid of weird opaque patches in render
- new
Add Colors From Spherical HarmonicsinFilter > Colors- Colorize points from ‘f_dc_0’, ‘f_dc_1’, ‘f_dc_2’ and ‘opacity’ fields that are present in 3D Gaussian Splatting PLY files- if you plan to export back to gaussian splatting ply file, you can remove colors in
Datapanel before exporting. regular gaussian splatting ply files does not contain colors, so they should be ignored even they are there, but that might depend on specific viewer implementation, to be safe, remove them. also exported file will be smaller..
- if you plan to export back to gaussian splatting ply file, you can remove colors in
- fix
Generate(from Mesh Surface and Mesh Volume sources) colors being black in Blender versions >= 3.5
2023
3.0.0.11 (alpha)
- new
Histogram 3Dfilter - new
Display > EffectsDisplace- move points along their normalsNoise- add “random” noise to positions
- new
Apply Shader Effectsfilter to apply shader effects directly to point data (note:Noisewill produce different result then on screen because of random numbers generation, it will look the same in large scale, but individual points will be on different places) - new option
Apply Shader EffectstoSequence > Batch Filter - refactored
Projectfilter- faster: projecting 1.8m points on mesh with 25k faces, color from uv 8k image, smooth normals, discard enabled, old: 5m 22s, refactored: 1m 26s, accelerated: 24s
- new
Use Open3Doption to do ray casting with Open3D (faster, no loops) instead of blender BVHTree (slower, no dependencies - is builtin) - new option to use closest point on mesh instead of ray casting, does not require normals on points
- fix of previous fix of color management with uv images
- fix of getting color attributes
- fix of getting uv coordinates due to api change (somewhere between blender 3.4 and 3.6)
Filterpanel sorted to categoriesPoints,Colors,Normals,ScalarsandMesh, general rule is: filters removing something are on top, then modifying and lastly adding filters, order from most used to less (well, based on me..)Transfer Colorsfilter, when existing and saved image is used, margin obtained with cycles baking will use saved image pixels instead of just generated (may be a blender bug) so it is no longer possible to select existing image from list, but it is forced to create a new image via button similar to blender new image, new blank images are not affected by this so margin will be created from generated pixels as it should beASCII Preset Buildercontrol number of lines (1-32, default is still 10) shown in previewBatch Filtermenu sorted to categories mirroringFiltersubpanels- fix
Transfer Colorsfilter color management with float images - fix
ConvertandGenerateto always use appended copy of material and node tree (was a bug, not feature) - fix
Blur Scalarerror when neighbours=1
3.0.0.10 (alpha)
Tools > Lasso SelectandTools > Circle Select, significantly better performance, drawn area size has no longer impact on performance, only number of points under selection and not that much, from my tests, large selection (relatively large drawn area (~500x500px@72), a lot of points under area (~1m)) from ~1m50s to ~1s, so more than 100x faster. please note, tool is caching points projected to 2d screen space (old versions did the same too), that cache is invalidated when view is moved. so first use of tool is slightly slower then subsequent if view is not moved because points got to be projected to 2d, mentioned test times are including cache creation, point selecting algo is much faster.- new “Undo/Redo” (a bit exaggerated) system, mainly meant for filters, but working also with tools etc, everything that change loaded point data directly.
Storestate of point data with a button, thenRestoreif you want to go back to that stored state at any time, only one state is stored, it is cleared when new point cloud file is loaded, current unloaded, container object is deleted and renamed, when new blend file is loaded or whenClearbutton is pressed. a bit crude system, but better than nothing. - new “Fancy” selection shader, looks better, takes more gpu memory (needs points colors), in case memory is a problem, uncheck
Fancy Selection Shaderin preferences to use old shader - new
Clone Selectedoperator inCleanup Toolsto copy selected points to a new pcv instance (for example clone can be transformed and joined back) - new
Blur Scalarfilter, averages scalar values in radius (better) or by n nearest neighbours (faster) - new
Scalars From Mesh UVfilter, adds 2 scalars (u, v) computed from target mesh by proximity (needed that for some custom processing, maybe someone will find that useful as well) - new
Convert Scalarfilter, lets you remap values and convert data type of scalar field - new
Standard PTSoption forLoadandAddoperators, will use special PTS reader that expect standard fields format and order (x, y, z, intensity, red, green, blue), this is format used during PTS exporting from pcv. also available as defaults option in pcv preferences, if enabled it will be used for files with .pts extension, if disabled, pts file will be processed with generic ascii reader and requires saved preset (as it was until now) - new
Screened PoissonSurface Reconstruction filter, depends onPyMeshLab, can also transfer point colors and all scalars (as floats, no type checking, also requiresscipyinstalled) to result mesh Joinfilter, newKeep Transformationoption to copy transformation from active pcv instance- support for sequences of other file formats - las, laz, e57, pts (standard flavour, see
Standard PTSload option), all formats that can be exported can be loaded back as sequence, bothPreloadedandOn The Flysequence types are supported Sequence > Batch Exportcan now export any file format selected inExportpanel- new
Sequence > Batch Operations > Batch Apply Transformationto apply container transformation on all sequence frames (export sequence to keep changes) - fix tool widgets drawing in other viewports then initial
- fix retopology tools save function when blend file has not been saved yet and has no filepath
- KNOWN ISSUE: another incompatibility found:
Open3Dandlaszip, only on Windows. loading LAZ file and then using Open3D filter leads to instant crash (also true whenlaszipis just installed and LAS file is loaded). workaround is the same as withOpen3Dandpye57, load LAS/LAZ, export as PLY, restart blender, load PLY and continue withOpen3Dfilter (or pack points and save blend, exporting to PLY can keep shift/scale, packing to blend will remove it). unless library is fixed in future i see no other way around it. the crash is so hard it leaves no log, no message, no clue..- this is main cause of new pcv preferences option:
Prevent Library Conflicts, it is visible on all platforms, but ONLY on Windows it actually does something (at the time of writing). it is making sure that blender does not crash, for example by preventing you running filter (with message popup) that is usingOpen3Dafter conflicting file reading library has been used to load points. turn off to disable checks if you are feeling lucky..
- this is main cause of new pcv preferences option:
3.0.0.9 (alpha)
- updated compatibility of optional libraries to latest versions (run
Install Xoperators from pcv preferences again to update) - blender requirement is 3.6 now (because of
numpyversion required byOpen3D, the rest of pcv is stil compatible with 3.4) - set custom or modify current shift/scale, useful when you need to load separate files that should match. you can also sync shift/scale, but setting values directly allow more control
- disabled auto shuffling, loading is now ~40% faster, added
Shuffle Pointsbutton next toDisplay > Percentageslider, addedShuffleoption toConvertifSubsetof points is requested - removed
Merge With Other PLYfilter, useJoinfilter to merge point clouds from any source files together - float colors are not clipped (to 0.0-1.0 range) anywhere unless exported to file format that does not support them. colors over 1.0 is very rare scenario, regular scanned data should be in 0.0-1.0 range, but since pcv can generate colors also from exr images, might be useful to leave unclipped values. when points converted to mesh should emit light for example
- new filter
Clip Colors, clips color values to 0.0-1.0. that’s all it does. just in case unclipped colors are not desirable and float color export is still needed - new filter
Scalar From Mesh Vertex Group, create scalar field from mesh vertex group by point proximity - new
Clone Unclipped Pointsoperator inDisplay > Clip, copy visible - unclipped points to a new PCV instance Projectfilter, addedSmooth Normalsoption to interpolate smooth normals from projected face vertex normals- added new filters to
Sequence > Batch Filter Reset PCVmoved from Load to Preferences asReset PCV On Active Object, also addedReset PCV Preferencesbutton- fixed color management in
Projectfilter when color is taken from uv image source
3.0.0.8 (alpha)
- redesigned data runtime storage
- keep double precision positions (if possible, depends on source file format)
- takes much less system ram when colors/normals are not available in source file (down to 1/3 in best case)
- system ram does not peak that much during loading (1/3 of total is saved compared to previous version in some scenarios)
- slightly better performance when creating from raw loaded points (in exchange with slightly slower gpu batches creating when doubles are stored)
- shift/scale to fit single precision for display is fully automatic and reversible if source file contains positions as double precision floats (if file contains only single precision, it will be executed as well and positions will be converted to doubles, although precision is already lost when source file was created)
- some operations can remove shift/scale, operator should warn about that, if not it is a bug
- some filters, especially those which use blender data to set positions may remove double precision positions (this will be addressed)
- if Packer is used, precision is lost, because blender stores mesh vertices positions in floats, if high precision is required, do not use Packer, always export point cloud file if points are modified. Packer is just workflow convenience if precision higher than 32 floats provide is not needed and it is not required to export points exactly at original locations as in initial file
- export LAS/LAZ (depends on
laspy/laszip), las version 1.2, point format 3 and extra dimensions (optional normals and other scalars (other than standard fields) https://laspy.readthedocs.io/en/latest/intro.html#point-records), it is always a new file, original header data (if source is LAS/LAZ) is not copied (as for now) - export E57 (depends on
pye57), only positions, intensity (if exists) and colors (pye57 does not support normals), it is always a new file, original header data (if source is E57) is not copied (as for now) - E57 and LAS/LAZ are exported unshifted/unscaled because file format allows it, PLY and PTS, unshift/unscale is optional
- export PTS changed floating point numbers handling, if point data has shift/scale and it is requested to be unapplied, 16 decimal places for doubles will be used, else 6 for regular floats
- export PLY
- ascii PLY uses 16 decimal places for doubles and 6 for floats (applies for point positions, normals, colors and scalars as well)
- added option for colors data type, now can export uint8 (that is usual format, it is default), uint16 and float32, colors are always in srgb, float32 colors are unclipped, if float32 colors are used, there is also option to convert them to linear color space
- load LAS/LAZ detect normals in file, if there are 3 scalar fields (x, y, z) named in one of these conventions (‘nx’, ‘NormalX’, ‘normal_x’, ‘normalx’, ‘normal x’), those fields will be used together as point normals (and removed from scalars). this is optional, can be set in preferences for add and load operators and can be changed on object as well in Load > Reader Options
- DBSCAN Clustering filter (depends on
open3d), result goes to new integer scalar field, can be later split with another filter - Outlier Removal filter (depends on
open3d), select and remove points that are most likely noise or artifacts - Split Points By Scalar Value filter, integer scalars only, splits points per unique value in scalar (useful after dbscan clustering or E57 import with scan indices to scalar field and files with classification)
- optional render to new image datablock instead of saving directly to disk (single render only, animation is always saved)
- fixed inaccuracy in 16 bit per channel colors handling during loading
- several convert and generate corner cases fixes, fixed color management with generate scene: lidar simulation and scene: project
- load e57 via
pye57library can be monkey patched to read weird files with scans without translation and rotation elements defined in header. option is available in pcv preferences underExperimental Features, library is modified at runtime, its files are not modified. it helps when reading e57 file ends in errorE57 element path well formed but not defined (E57_ERROR_PATH_UNDEFINED)and in console with lines like this:
  File "/Users/redacted/.local/lib/python3.10/site-packages/pye57/e57.py", line 214, in read_scan
    xyz = self.to_global(xyz, header.rotation, header.translation)
  File "/Users/redacted/.local/lib/python3.10/site-packages/pye57/scan_header.py", line 32, in rotation
    q = Quaternion([e.value() for e in self.node["pose"]["rotation"]])
pye57.libe57.E57Exception: E57 element path well formed but not defined (E57_ERROR_PATH_UNDEFINED)
3.0.0.7 (alpha)
- fix of
Convertfix from previous version Packeruses same logic, points are stored in mesh chunks with max 2 ** 26 vertices
3.0.0.6 (alpha)
- new
Densityfilter: make scalar from volume density (in sphere radius around each point), surface (projected to 2d along world z in circle radius) and neighbours (distance to closest neighbour point) - Convert to mesh/pointcloud operators will detect when more than 2 ** 26 (~67m) points is being converted and will split result meshes, each to fit in 2 ** 26 vertices (https://projects.blender.org/blender/blender/issues/110334)
- disable Display panel ui when no points are loaded
3.0.0.5 (alpha)
- e57 optional scan indices as scalar fields
- e57 optional scan poses as transformed empties parented to container object, available only in Add Helper: Shift+A > PCV
- filter
Remove Valuecan also use integer values - filter
Remove Valueno longer requires displayed scalar to edit, uses selection in Data panel Generate > Scene > Projectcan use perspective camera view (in addition to viewport perspective view)Generate > Scenebetter random noise inProjectandLidar Simulation, scaled with distance from “sensor”, creates scalars with xyz offsets and factor- some blender 4.0 compatibility fixes, but using blender 4.0 is not recommended, don’t know what will break next…
- fix the “if file is missing at absolute path, then same filename is loaded if exists next to blend” when path is windows style, but current platform is posix (blend file has been moved between platforms)
PCV 3.0 (alpha)
- Blender 3.4 and later
- right now available as alpha release
Core
- Metal gpu backend support
- one main shader, recompiled on the fly (instead of single use shaders)
- many shading options can be mixed together (opacity, blending modes)
- several performance improvements, data batches are recreated (and uploaded to gpu) only when needed
- all custom shaders (main shaders, internal utility shaders, tools shaders, render shaders, …) has been updated to be cross compilation ready (OpenGL, Metal and upcoming Vulkan backends)
Data
- new
Datapanel with overview what has been loaded from file - filters or other operators that expect scalar field to be selected now will use
Data > Scalar Fieldslist (with some exceptions that require displayed scalar, like remove value filter) - if linked file is not found, try to recover by loading file with same filename next to blend if exists, path will be updated if blend is saved
File I/O
- any supported format can now be selected as main file, import panel has been removed
- file loading options can be set at file select dialog
- import ascii files has been replaced with
ASCII Preset Builder - new export option:
PTS
Packer
- formerly experimental
Packeris enabled by default - loaded point data have to marked for packing (shield icon next to file path on main panel, like with other blender datablocks), the rest is automatic, driven by blend file save and load events
Packeroperators and packed data overview is in 3d viewport popup menu
Filter
- filters working with meshes has been updated to not use any deprecated mesh properties
- new
Distance To Meshto scalar field - new
Reducemethod toSimplifyfilter, remove points so their count is exactly given number - new
Add Noisefilter (uses either random sampling in sphere volume to add to current positions, or mathutils.noise.turbulence_vector (quite slow), for more advanced uses, convert data to mesh > point and modify positions with geometry nodes, better performance, undo, etc.) - removed
Discardfilters, they are substituted byDatapanel, any data except positions can be removed there
Render
- animation buffers caching to speed up rendering (depends, but by a lot in some cases), cannot be used with sequences and in some other cases, see checkbox tooltip
Convert
- complete rewrite (also because of deprecated mesh properties)
- to
Mesh- uses geometry nodes to instance mesh primitives or points, geometry nodes modifier is preserved to allow changes after conversion - to
Volume- creates vdb file that is reloaded back to blender - to
Pointcloud- pointcloud object in blender alpha builds - removed
ParticlesandInstancertypes
Generate
- complete rewrite (also because of deprecated mesh properties)
- uses Geometry Nodes as backend where applicable for much better performance
- new
Scene > Lidar Simulationgenerate type, project in spherical coords around origin, colorize with Cycles equirectangular render - new
Scene > Projectgenerate type, project from camera to scene, colorize with Cycles render using same camera - new
Rendergenerate type, generate from multilayer exr, camera and position or depth pass - active image node, material, uv etc is no longer needed, related datablocks are selected in ui by names
- removed
Particlessource
Sequence
- new
Batch Generateuses options inGeneratepanel Batch Exportuses options inExportpanel (including PTS export)
Postprocess
- output directly to image datablock for quick renders from viewport view
UI
- many areas reworked to fit new features
- presets for select panels in header
Preferences- loading defaults for main file select operator
2.2.1
- pcv preferences > install libraries > Check operator to list which library is installed and usable (importable)
- display warning if using Metal gpu backend in blender >= 3.5
2.2.0
Tools
- new ui, sorted to subpanels, options shown when tool is running
- new gpu accelerated Place 3D Cursor tool
- new tools for container transformation:
- Translate: move container so selected point is at given location
- Rotate XY: rotate container so 3 selected points at right angle to each otehr are aligned with x and y axes
- Align Z: shortest rotation around selected point with second point they are aligned with z axis
- Scale: select two points and scale container so distance between those two points matches given length
- new Gradient Select tool
- new tools for retopology:
- Polygon: select points or vertices, make polygons from them, tweak while snapping to points, and much more…
- Plane: select points, single quad plane is fitted between them, scaled to cover points, can be rotated before adding to mesh
- Cube: quickly draw cuboids by selecting 3 points and cuboid height
Display
- new Cull and Billboard Cull shaders, omit drawing of ‘backfacing’ points (requires correct normals on points to work)
Filters
- new option in Simplify filter: Voxel Grid v2 - faster, more options (also available in Sequence > Batch Filter)
Add Menu Helper
- added support for all readable file formats. defaults can be set in preferences and overrided when helper is being run (ascii file types need format preset saved in advance) and mixed file types can be added at once.
- removed File > Import menu item
Other
- need for Prevent Floating Point Precision Errors enabled is automaticly detected by default, user is notified when this happen (there is option in preferences to disable it)
- fixed detection of shift in negative direction when Prevent Floating Point Precision Errors is used
2.1.0
- filter: Hidden Point Removal (using Open3D), view dependent points removal
- render: Hidden Point Removal option, filter will be run on each frame on points that are send to render
- Height Shader: added global axes and fit to range options
2022
2.0.3
- fix open3d version requirement on other platforms than mac (required open3d 0.16.1 is available only for mac, while other platforms latest version is 0.16.0, haven’t noticed it…)
2.0.2
- fixed error in blender 3.4 on activation, one operator name was too long for blender taste
2.0.1
- new join sequences operator
- sequences can be loaded with gaps in frames, or with gaps merged. default is merge
- fixed playback when multiple sequences are loaded, there was 1 frame offset on second sequence, 2 frames on third and so on
- fixed error in batch filter > simplify
- fixed obscure context errors in batch filter when filter operator poll() fails
2.0.0
- Open3D 0.16.0 support (including python 3.10, so blender 3.1+ is supported)
- renamed addon directory to point_cloud_visualizer, does not matter much for normal use, only if you happen to use pcv in scripts, now it got to be imported with import point_cloud_visualizer as pcv for example
- updated laspy support to latest version
1.999.15
- preferences > calculator: calculate approx. number of points that can fit into given gpu memory while using default shader without scalars
- generate > mesh surface > project from view: basically you can simulate how real scanning is done. it can be run multiple times and new points are appended to existing. you can add some jitter in pixel grid and some displacement noise to look more realistic. want to blend generated points with real? this is tool for you
- fix render > depth and mask pass file format (was always saved as png, instead of what was set in blender properties > output)
1.999.14
- new helper operator Export, export all/selected/active pcv instances to ply files
- new export option Ignore Zero Scalars, do not export scalars that sum to zero
- new filter Poisson Disk Elimination (depends on scipy), even spaced subsampling
- fix incorrect/error default colors in some cases
- ui Convert panel
- ui pye57 is now default option for importing e57 files
1.999.13
- all colors pickers in ui are gamma corrected
- fixed index error (when exact emitter face cannot be found, nearest will be used), color interpolation (was not working properly) and emitter transformation in generate from particle system
- fixed linear to srgb conversion colors in generate from geometry nodes vertices (most of colors in blender are in linear color space, pcv uses gamma corrected as they are in ply, las, etc. files)
- fixed missing alpha blending when selection is displayed
- fixed container transformation in Split Selected operator in Remove Color, Remove Value filters and Tools
- fixed Transfer Colors ui
1.999.12
- generate points from geometry nodes vertices and attributes
- filter > Remove Value and edit > Select Value (both for scalars) can now select single value instead of range only (input value is converted to scalar data type before selecting, e.g. if scalar is unsigned int then ui input float value is converted positive integer, so input 1.789 will select 1 in integer scalar)
- filter > Project new parameter Strength, at 1.0 points land on surface, at 0.5 they will move half way and so on
- filter > Simplify new method option Slice, it does the same as Display > Percentage, but it applies to points directly
- fixed unresponsive blender ui after render is finished on windows ( @Aepi9 )
- removed export > visible only, because of confusion, use filter > simplify > slice to get the same result
1.999.11
- new Convert option: Mesh To Points, creates vertex mesh with attributes from points, adds geometry nodes that converts vertices to points and assigns colors to points and adds material, with this you get cycles point cloud rendering without need for blender alpha build (works in blender 3.1+)
- Start Frame setting for ply sequences
- Split Selected operator for Remove Color and Remove Value filters and selection Tools
- updated optional packages to latest versions (except open3d which is not yet available for python 3.10 included in blender 3.1+), to update package, click its install button from preferences
- fixed scalar soft light blend mode formula
- fixed some primitive drawing types deprecation in blender 3.2
- fixed viewport name label depth in some situations
- fixed point selection drawing in some situations
- fixed center viewport camera view on points operator in some situations and renamed to Frame Points
- fixed sequence playback not restarting after end of sequence is reached while Cycle Forever is turned off
1.999.10
- fixed ply export
- fixed project filter (https://developer.blender.org/T97025)
1.999.9
- new Add Colors and Add Normals filters to create Colors and Normals from scalar values
- new Invert Selection operator in Tools
- new Save As Render option to use view transformation as set in Color Management properties
- render operator is now using properties from: Output Properties > Format, Output Properties > Output and Render Properties > Color Management instead its own, more standard path handling, save any still image format, all color and color depth options, color management looks, etc…
- pye57 support for reading multi scan e57 files
- compatibility with pymeshlab 2022.2.post2
- fixed pip installing latest package instead of specific version
- fixed clip planes in Color Adjustment shader
1.999.8
- All new Tools panel
- Place 3D Cursor
- Box Select
- Lasso Select
- Circle Select
- X-Ray Shader
1.999.7
- Blending modes for scalars (Normal, Multiply, Screen, Overlay, Soft Light)
- Color adjustment (Exposure, Gamma, Brightness, Contrast) per channel in shader and filter
- Discard filters (Discard Normals/Colors/Scalars)
- Generate from native pointcloud object (Blender 3.1 Alpha or Blender 3.2 Alpha, i.e. build with pointcloud object enabled)
- Viewport postprocessing
- LAZ import: https://github.com/tmontaigu/laszip-python 3
- Alternative E57 reader: https://github.com/davidcaron/pye57 6
- Reading all points from E57 multi scan file when using PyMeshLab for import
- Better ui for packages installation in preferences
- Removed Extras panel and moved contents to filters
- Plugin icon in ui marks functionality depending on 3rd party package
1.999.6
- optional installs (open3d, laspy, etc) are now installed into user python site-packages on all platforms, windows and linux users no longer need to use blender portable/zip distribution
- added sequence batch filter, convert and export to ply. sequence have to be preloaded (not loaded on-the-fly). batch filter and convert uses settings as set in filter/convert panels, batch export uses its own settings in batch export panel. so, for example, if you want apply Remove Duplicates to sequence go Filter > Remove Duplicates, set desired distance, go Sequence > Batch Filter choose Remove Duplicates from list and click Batch Filter. if you start blender from command line, each sequence frame is printed so you can observe some progress
1.999.5
- convert to blender native point cloud object (blender 3.1) - can be rendered in cycles as spheres: https://developer.blender.org/D9887 12
- buttons to uninstall optional libraries
2021
1.999.4
- install Open3d button enabled, Open3d 0.14.1 is already available on PyPI for python 3.9 shipped with blender 3.0
- added “Remove Duplicates” filter for removing points from too dense areas or for very fast subsampling (uses SciPy, need to be installed from preferences, or it comes with Open3d)
- added reload upon export option, so exported points can be reloaded from exported file after export
- added convert to geonodes, number of vertices in instance mesh is calculated from instanced mesh itself
- fixed render when some of points have in front option enabled and rendering of all points in scene is requested
- fixed animation render not updating when some of pcv properties are animated
- fixed sync display settings in 3d view menu
1.999.3
- pcd format import (ascii and binary types), my own custom implementation so i consider it experimental
- e57 format import via pymeshlab (only position, normal and color is imported), experimental as well, if you use older macos than catalina it will crash blender, linux and windows are untested yet
- load default options in preferences for helpers (File > Import > PCV and Add > PCV)
- added normals length in edit mode
- fixed transfer colors to texture exception when uv is from edge to edge
- fixed render all scene points in depth and mask passes
1.999.2
- blender 3.0+ only (bgl module is being deprecated, gpu module only is now used, so “Prepared for the future!”)
- scalar color schemes
- all new edit mode (on the inside - using mesh attributes), works with scalars, can select by scalar value, set scalar value, flip normals
- all filters preserve scalars
- new filters for working with scalars: Remove Value, Colorize, Add Scalar
- render extra mask and depth pass in separate files (there seems to be no way to make multi layer file via python)
- updated Open3D, installation right now need some extra steps, when Open3D 0.14 will be released on PyPI, i enable button in preferences for easy installing
1.999.1
- scalar display is now handled in shaders - faster, can be animated and rendered, added bleeding parameter to mix colors and scalar
- whole internal shader system rewritten, any shader can use clip planes and mixing with scalar
- added sequence “on the fly” frame ply loading - no need to preload all frames, reasonably fast with smaller files, works for render too
- all filters updated to work with new data system and scalars
- fix “in front” display option
- fix export ply with scalars
- and many smaller things…
1.10.0
- convert to geometry nodes with colors (blender 3.0+)
- convert to mesh divided to even chunks
- render points in 3d viewport together with other scene objects
1.9.0
- clipping planes for all shaders (viewport and render)
- auto clipping planes update, linked object can be animated (viewport and render)
- more Split filter options
- shader panel updated
1.8.0
- faster rendering
- render current or all visible point clouds
- optional shuffle when joining points
- optional basic uv layout generation for Convert (mesh based result)
- Convert to vertex mesh with pcv-normal and pcv-color attributes (to be used with Geometry Nodes)
1.7.0
- new in edit mode: Select Color and Set Color
- new filters Split and Join
- Project filter point position change is now optional
- Remove Color both by color and numbers and Color Adjustment Apply speed improvements
- fixed View Points not being correct when container is transformed
2020
1.6.0
- point set registration with several global and local methods (using Open3D)
- normal estimation with normal orientation by direction or camera location (using Open3D)
- new Fast viewport shader
- new File > Import and 3D Viewport > Add helper menu operators
- new center view on points operator
- new edit operators: points to origin, apply transformation
- edit mode enter, update and exit significantly faster
- faster render manual depth sorting
- compatibility with Blender 2.91 viewport drawing and rendering
- compatibility with Open3D 0.10.0
- fixed edit mode ui glitches
- fixed ascii import guess separator
1.5.0
- import points from text file formats
1.4.0
- MatCap and MatCap Billboard shaders
- Fast bounding box Crop points
- Open3D: Voxel Downsample, Estimate Normals and Surface Reconstruction
- fixed render transparency (blender 2.9x)
1.3.0
- Remove Color numeric input with python expression and invert selection operator
- Convert use custom mesh as instance
- Project filter align projected point normal to target mesh surface normal
- fixed point generation on triangles with very small area when using Weighted Random In Triangle
- fixed Sequence not reseting when new blend is loaded
1.2.0
- viewport menu to batch control PCV instances
- Height Colors, Depth Effects and Alpha shaders
- load alpha, export alpha
- render with manual depth sorting
- fixed sequence animation render
1.1.0
- Transfer colors from points to mesh vertex colors or uv texture
- Voxel-like simplification method
- Generate points in mesh volume
1.0.0
- core completely rewritten
- takes less system memory
- better undo / redo handling
- partial ply loading - slice, evenly spaced or random strategies
- out of video memory crash prevention with maximum display points user setting
- more shader types and shader options (Phong, Billboard, Billboard Phong, Fresnel, Bounding Box, Position with scale and offset)
- render to image with any shader
- optional faster triangulated conversion to mesh
- many small fixes and optimizations
2019
- 0.9.30 join filter, ui tweaks, fixes
- 0.9.29 fixes, render logging
- 0.9.28 clipping planes from object bounding box, faster all numpy export, many minor fixes
- 0.9.27 render supersampling and draw smooth circles
- 0.9.26 color adjustment fixes
- 0.9.25 color adjustment, faster boolean
- 0.9.24 project colors
- 0.9.23 fixes
- 0.9.22 extra debug shaders
- 0.9.21 preferences
- 0.9.20 ui changes, poisson disk sampling generation, size and alpha available in edit mode, various fixes, removed manual depth sorting during render
- 0.9.19 point cloud generation from vertices and particles
- 0.9.18 point cloud generation from mesh surface
- 0.9.17 fixes
- 0.9.16 boolean filters
- 0.9.15 selection preview for remove color filter
- 0.9.14 external api improvements
- 0.9.13 faster normals drawing
- 0.9.12 ply sequence, external api
- 0.9.11 merge filter
- 0.9.10 ui
- 0.9.9 point cloud global alpha
- 0.9.8 basic editing
- 0.9.7 project point cloud on mesh surface
- 0.9.6 ply exporting now uses original or viewport data
- 0.9.5 simplify and remove color filters
- 0.9.4 export ply
- 0.9.3 conversion to instancer
- 0.9.2 load ply with 16bit colors
- 0.9.1 all new render settings
- 0.9.0 conversion to particles
- 0.8.14 fixes
- 0.8.13 fixes
- 0.8.12 fixes
- 0.8.11 ui tweaks
- 0.8.10 fixes
- 0.8.9 ui tweaks, code cleanup
- 0.8.8 refactored convert to mesh
- 0.8.7 fixed vcols bug in convert
- 0.8.6 ui tweaks, a few minor optimizations
- 0.8.5 convert to mesh all or subset
- 0.8.4 preferences, ui tweaks
- 0.8.3 display normals
- 0.8.2 fixed shader unknown attribute name
- 0.8.1 fixed ply with alpha, fixed convert to mesh when normals or colors are missing
- 0.8.0 convert to mesh
- 0.7.2 ui tweaks
- 0.7.1 viewport performance fixes
- 0.7.0 ascii ply support
- 0.6.6 fixed drawing after undo/redo
- 0.6.5 point cloud illumination
- 0.6.4 refactored draw handlers, fixed occasional crash on erase
- 0.6.3 added percentage of rendered points, fixed render colors to look the same as in viewport
- 0.6.2 fixed point size display in viewport, separated view and render point size
- 0.6.1 single cloud rendering almost completely rewritten to be better and faster
- 0.6.0 single cloud rendering
2018
- 0.5.2 refactored some logic, removed icons from buttons
- 0.5.1 load ply without vertex colors, uniform grey will be used
- 0.5.0 performance improvements using numpy for loading and processing data
- 0.4.6 fixed crash when parent object is deleted while drawing, fixed removal of loaded data when parent is deleted
- 0.4.5 added ‘Display’ percentage, better error handling during .ply loading
- 0.4.0 almost complete rewrite for blender 2.80, performance improvements using shaders, simplified ui
2017
- 0.3.0 new ply loader, can be used with any binary ply file with vertex coordinates and colors
- 0.2.0 display percentage
- 0.1.0 first release